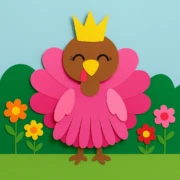
Royal Garden Turkey Queen Paper Craft
Create a colorful and imaginative Royal Garden Turkey Queen Paper Craft using simple materials like colored cardstock, glue, and scissors. This craft is perfect for Thanksgiving, springtime, or classroom art projects. Bright pink feathers, a golden crown, and a floral garden backdrop make this paper turkey a whimsical favorite for kids. A great DIY for preschool and elementary-aged children that encourages creativity, storytelling, and fine motor skills. Use this fun craft idea for seasonal classroom decor, story prompts, or weekend crafting activities at home.
Equipment
- Safety scissors
- Glue stick or craft glue
- Black marker or pen
- Pencil
- Ruler
Materials
Main Materials
- Colored cardstock (pink, yellow, brown, red, green)
- Printable turkey queen template
Instructions
- Step 1: Prepare and Cut All Paper Shapes — Trace and cut out body parts, feathers, crown, beak, and other shapes from colored cardstock using the printable template as a guide.
- Step 2: Assemble the Turkey's Body — Glue the body and head together onto your background paper.
- Step 3: Add the Wings and Tail Feathers — Arrange and glue the pink feathers behind the body, and attach the wings on each side.
- Step 4: Attach the Beak, Wattle, and Crown — Add facial features and crown to the head, using glue and a black marker for details.
- Step 5: Create the Floral Garden Background — Cut and glue green hills, flowers, and stems around the turkey.
- Step 6: Glue All Parts and Final Touches — Ensure all pieces are secured and add any embellishments or names.
Notes
Pre-cut shapes for younger kids to make the process easier and safer. Use the printable template for consistent sizing. Choose contrasting background colors to make your turkey queen pop.
