
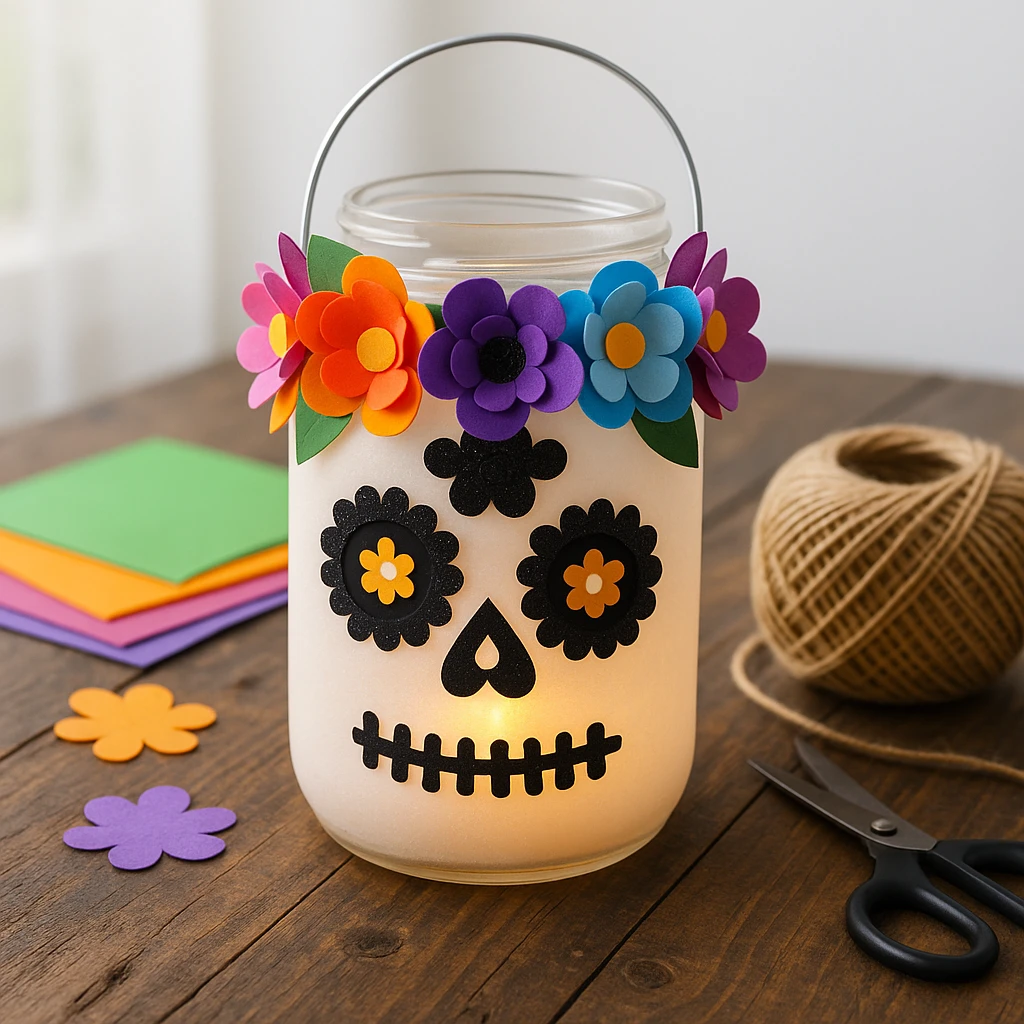
Celebrate the vibrant traditions of Día de los Muertos with this charming Sugar Skull Lantern Jar adorned with a colorful paper flower crown. This DIY craft combines simple materials like recycled jars, cardstock, and LED lights to create a glowing lantern that is both decorative and meaningful. Whether you're crafting with kids or designing decor for a themed celebration, this lantern adds a personal touch to your setup.

The sugar skull motif is a powerful and festive symbol of remembrance, and this craft project allows for plenty of creativity. From selecting bright, cheerful colors to designing expressive skull features, it's a fun and engaging activity for all ages. This jar lantern can be used as a table centerpiece, windowsill decoration, or even part of a spooky yet sweet Halloween display.
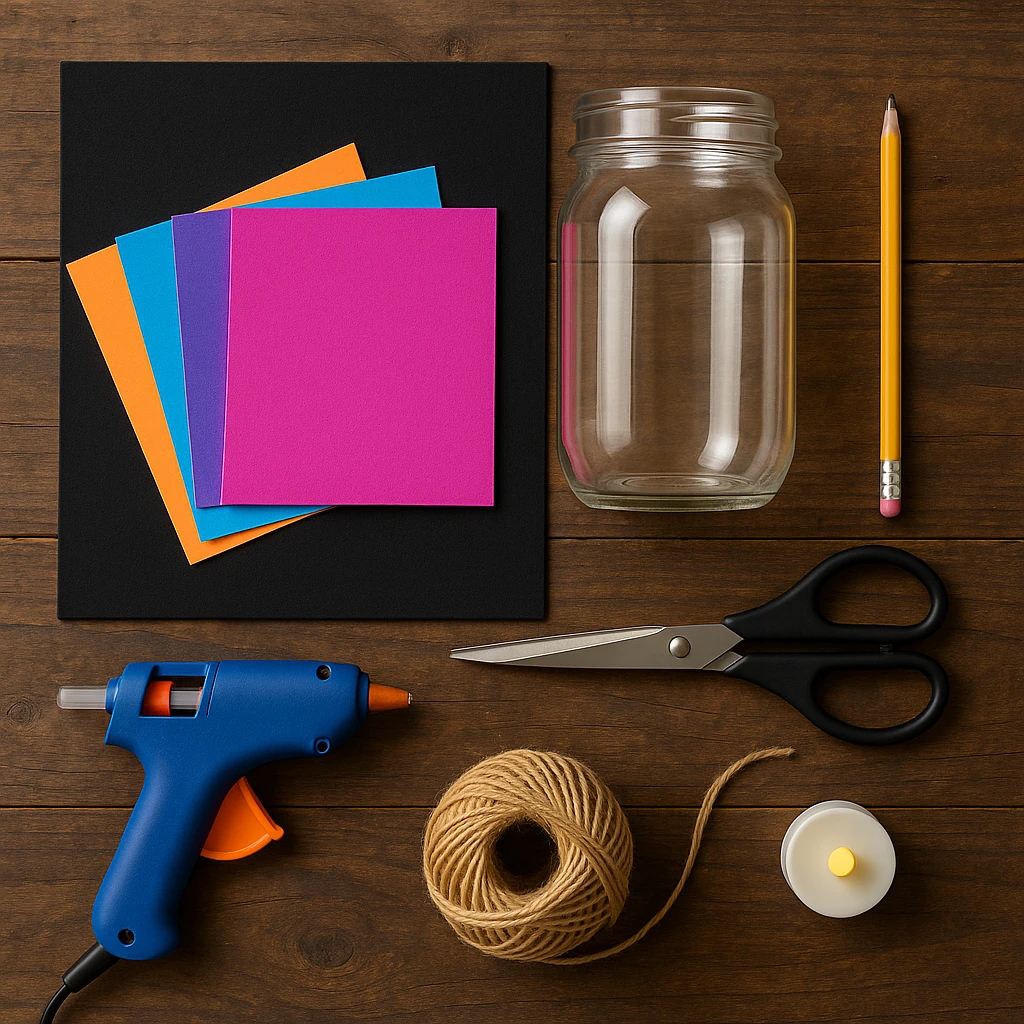
Materials Needed
- 1 mason jar or recycled glass jar (clean and label-free)
- Black craft foam or cardstock (for eyes, nose, mouth)
- Assorted colorful cardstock or foam sheets (for flowers)
- Scissors
- Hot glue gun or craft glue
- Pencil
- LED tealight or battery-powered fairy lights
- Twine or wire (optional, for handle)
- Printable template for skull features and flowers (see end of article)
Step 1: Clean and Prep the Jar
Start by washing and drying your jar thoroughly. Remove any labels or sticky residue so the surface is smooth and clean. This will help your decorations stick better and create a neater finish.
Step 2: Cut Out Sugar Skull Facial Features
Using black craft foam or cardstock, draw and cut out two large eye shapes, a small heart or triangle for the nose, and a decorative mouth shape. If you're using the printable template, trace these shapes onto the black paper first before cutting.
Step 3: Create the Paper Flowers
Trace and cut flower shapes from colorful cardstock or foam. You can layer smaller flowers on top of larger ones to create dimension. Curl the edges slightly with your fingers or a pencil to give them a more natural look. Make at least 6 to 8 flowers in varying colors.
Step 4: Attach the Facial Features
With your jar facing forward, use a hot glue gun or craft glue to attach the facial pieces: eyes first, followed by the nose and mouth. Position them carefully to give your sugar skull a friendly or festive expression.
Step 5: Glue the Flower Crown Around the Rim
Glue your colorful flowers around the top rim of the jar, overlapping them slightly for a full and lively look. Mix and match colors to make the flower crown eye-catching and celebratory.
Step 6: Add the Handle (Optional)
If you want your lantern to hang, attach a wire or piece of twine around the neck of the jar. Make sure it's secure and balanced. This is especially helpful if you're using these as hanging decorations.
Step 7: Insert LED Light and Display
Place a battery-powered LED tealight or fairy lights inside the jar. Turn them on, and watch your sugar skull lantern glow beautifully from within. Display it on your table, shelf, or windowsill to brighten your space.
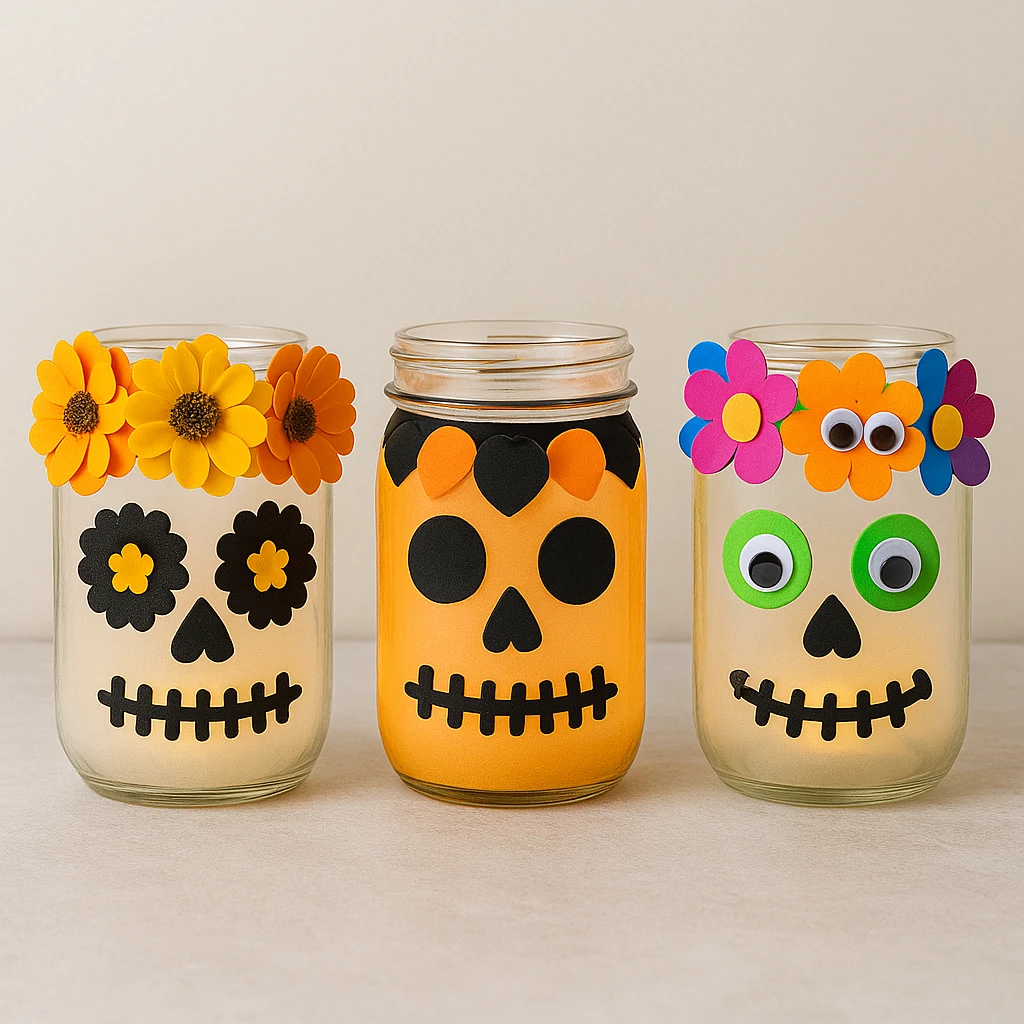
Customization Ideas
1. Classic Day of the Dead: Use warm tones like marigold orange, ruby red, and magenta for the flowers. Add small white dots or embellishments on the skull face to mimic sugar skull icing.
2. Halloween Theme: Opt for black, orange, and purple paper for a spooky twist. You can add spider web or bat motifs along with the skull face.
3. Kids' Party Version: Use bright neon colors and oversized googly eyes for a playful look. Let kids decorate their own lanterns with stickers or glitter glue.
Educational or Seasonal Uses
This lantern is a wonderful way to teach children about cultural traditions like Día de los Muertos, sparking conversations about remembrance and family. It also serves as a versatile project for fall crafting, Halloween events, or multicultural classroom activities. Whether you're planning a themed party or a seasonal workshop, this DIY craft fits right in.
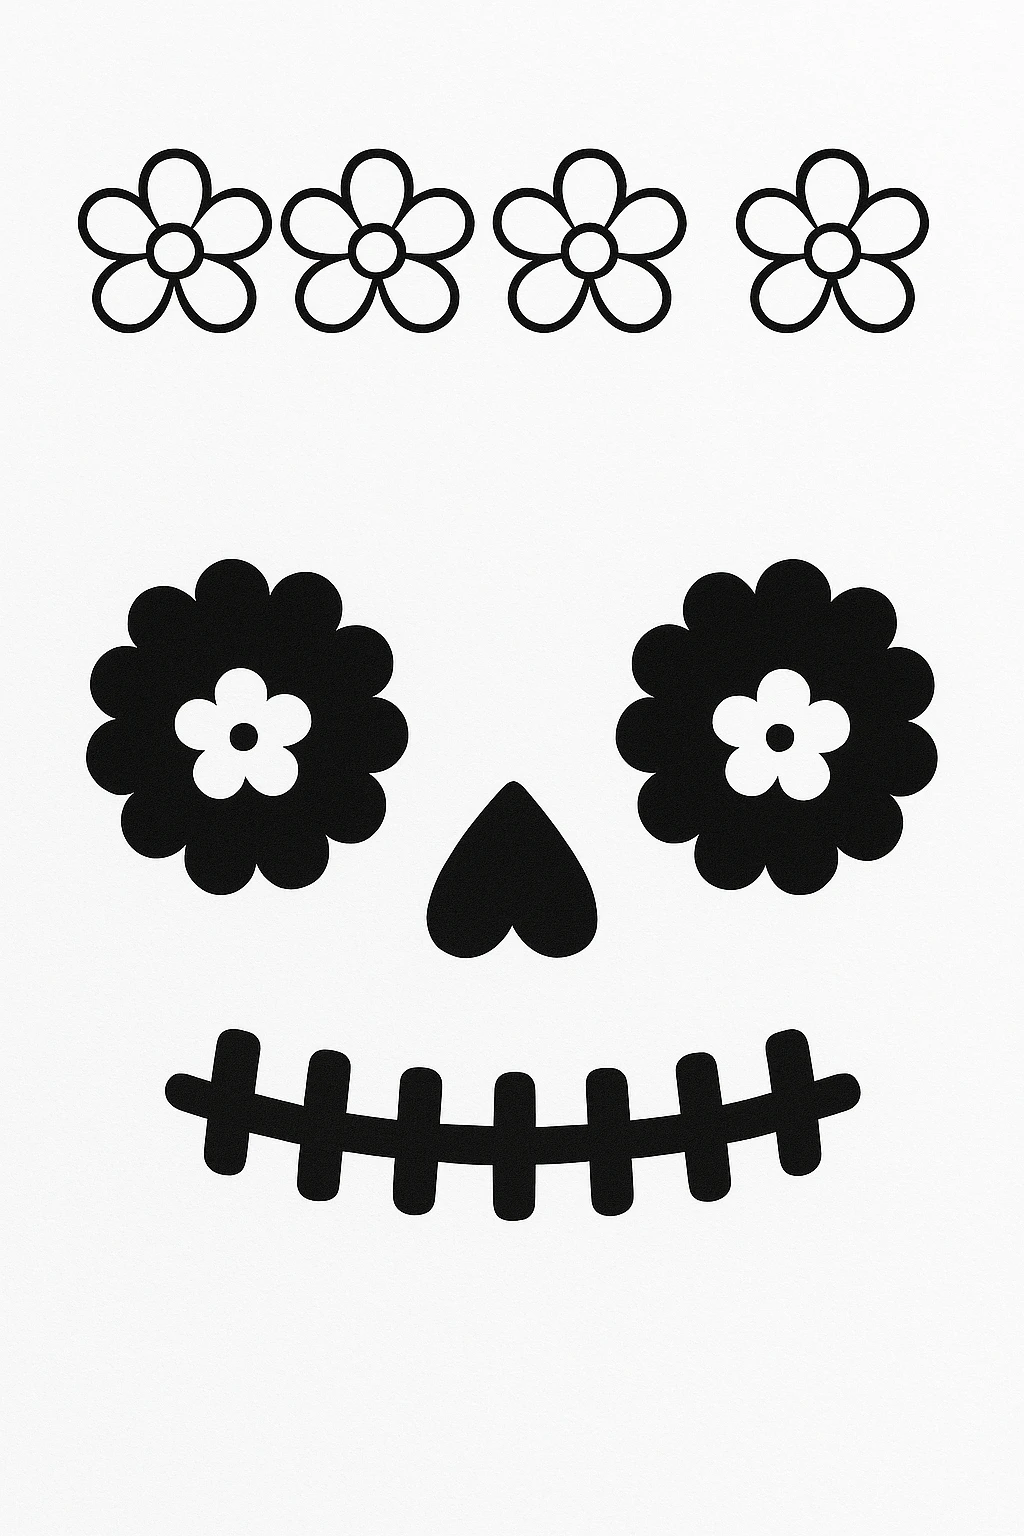
Printable Template
To make crafting even easier, we've included a printable template for the sugar skull face pieces and the paper flowers. Simply print the page on standard 8.5" x 11" paper, cut out the shapes, and trace them onto your chosen cardstock colors. Kids can also color in the shapes before cutting for a more personalized look. With the template, there's no need to draw the designs yourself—just print, cut, and glue.
You can find the printable at the end of this article. Once printed, all you need are scissors and creativity to bring your lantern to life.
Conclusion
Crafting a Sugar Skull Lantern Jar with a paper flower crown is a joyful and creative way to celebrate both culture and season. With simple materials and a step-by-step process, anyone can make a beautiful glowing keepsake. Customize it to suit your style or occasion, and enjoy the cozy charm it brings to your home or event.
Sugar Skull Lantern Jar with Paper Flower Crown
Equipment
- Scissors
- Hot glue gun or craft glue
- Pencil
Materials
- 1 Mason jar or recycled glass jar
- Black craft foam or cardstock for eyes, nose, mouth
- Colorful cardstock or foam sheets assorted for flowers
- 1 LED tealight or fairy lights
- Twine or wire optional for handle
- 1 Printable template for skull features and flowers
Instructions
- Start by washing and drying your jar thoroughly. Remove any labels or sticky residue so the surface is clean and smooth.
- Draw and cut out the sugar skull facial features from black craft foam or cardstock. Use the printable template to trace eye shapes, nose, and mouth.
- Cut flowers from colorful cardstock or foam, layering different sizes for depth. Curl edges slightly for a realistic look.
- Glue the facial features onto the front of the jar, starting with the eyes, followed by the nose and mouth.
- Attach the colorful flowers around the top rim of the jar to form a vibrant flower crown.
- If you'd like a hanging lantern, secure a wire or twine handle around the neck of the jar.
- Place an LED tealight or fairy lights inside the jar. Turn it on and enjoy the beautiful glow of your sugar skull lantern.