
Día de los Muertos is a vibrant celebration of life, heritage, and remembrance. One of the most iconic symbols of this Mexican tradition is the sugar skull, a colorful and joyful representation of those who have passed. Incorporating these symbols into crafts not only adds beauty to your home decor but also helps keep the tradition alive through creativity.
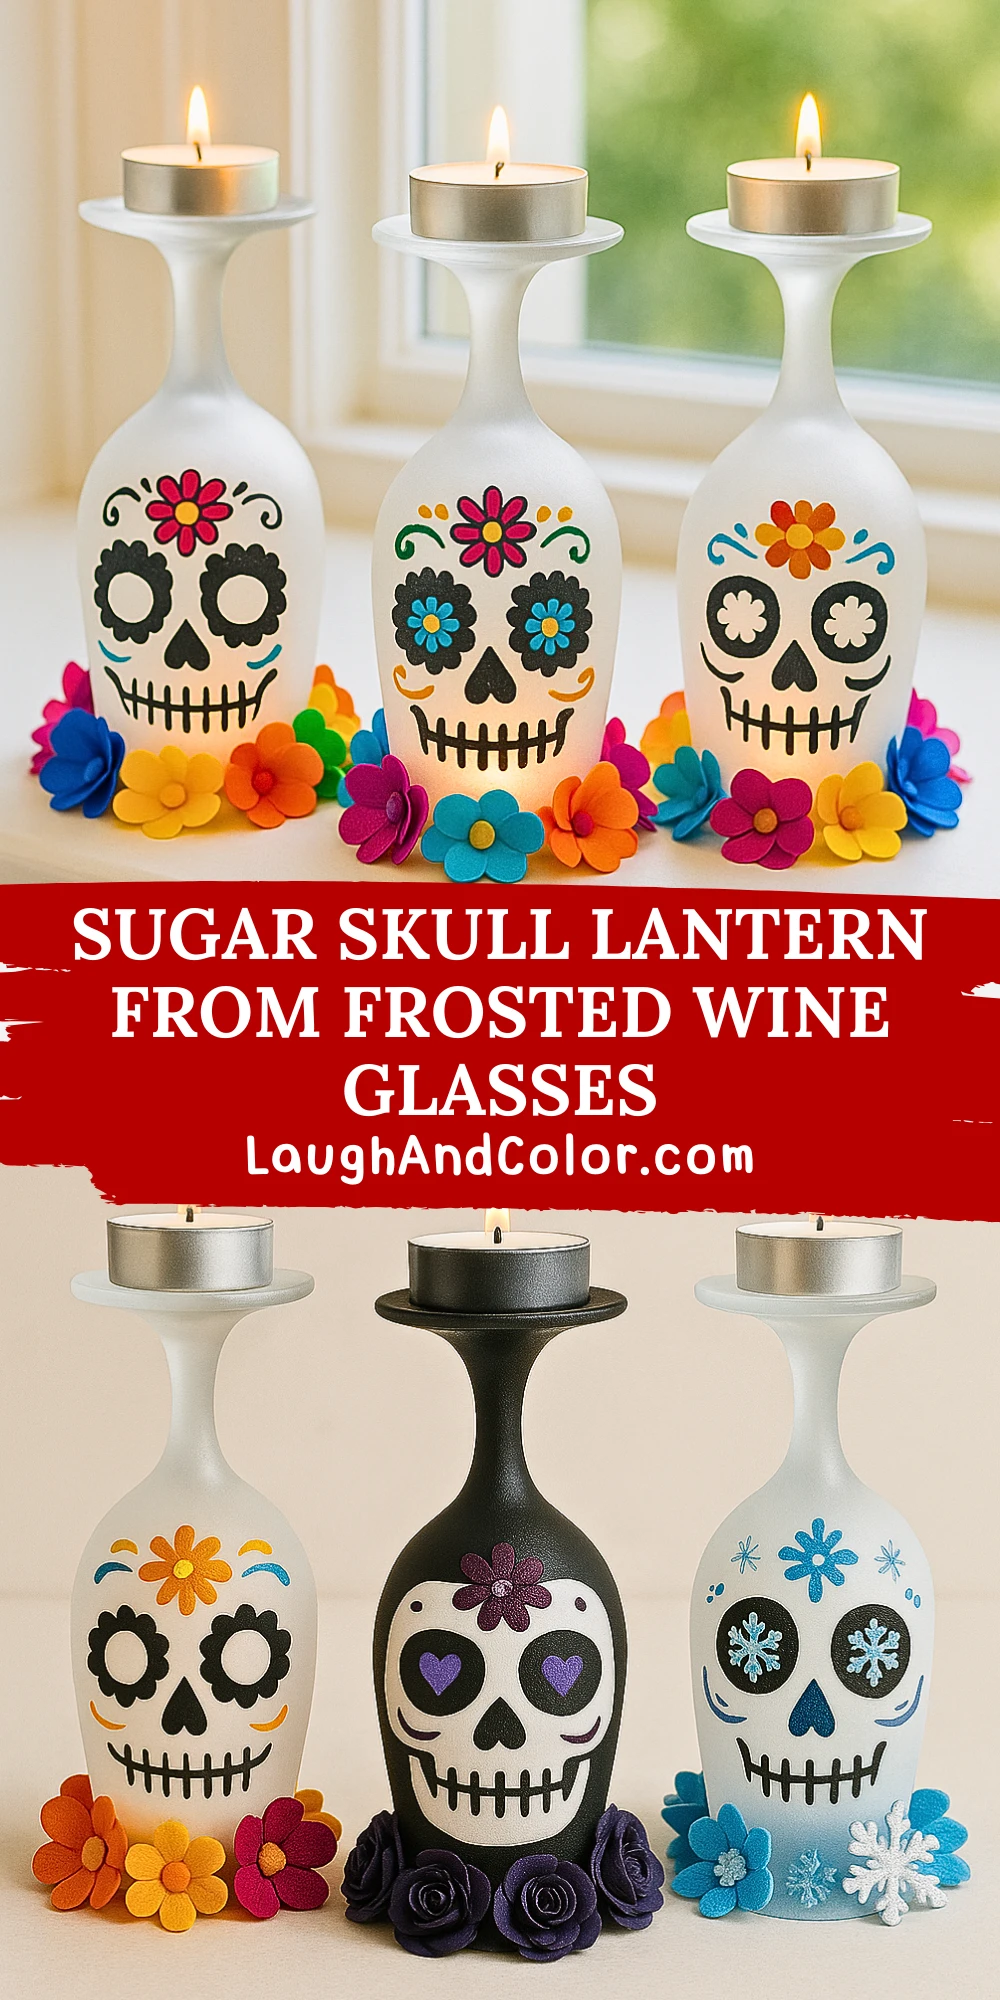
This DIY Sugar Skull Lantern project transforms ordinary frosted wine glasses into glowing tributes of light and color. Perfect for seasonal celebrations or simply to brighten a space with cultural flair, these lanterns are a fun and meaningful way to craft with family or students. Using simple materials and a bit of paint, you’ll create stunning lanterns that are both festive and functional.
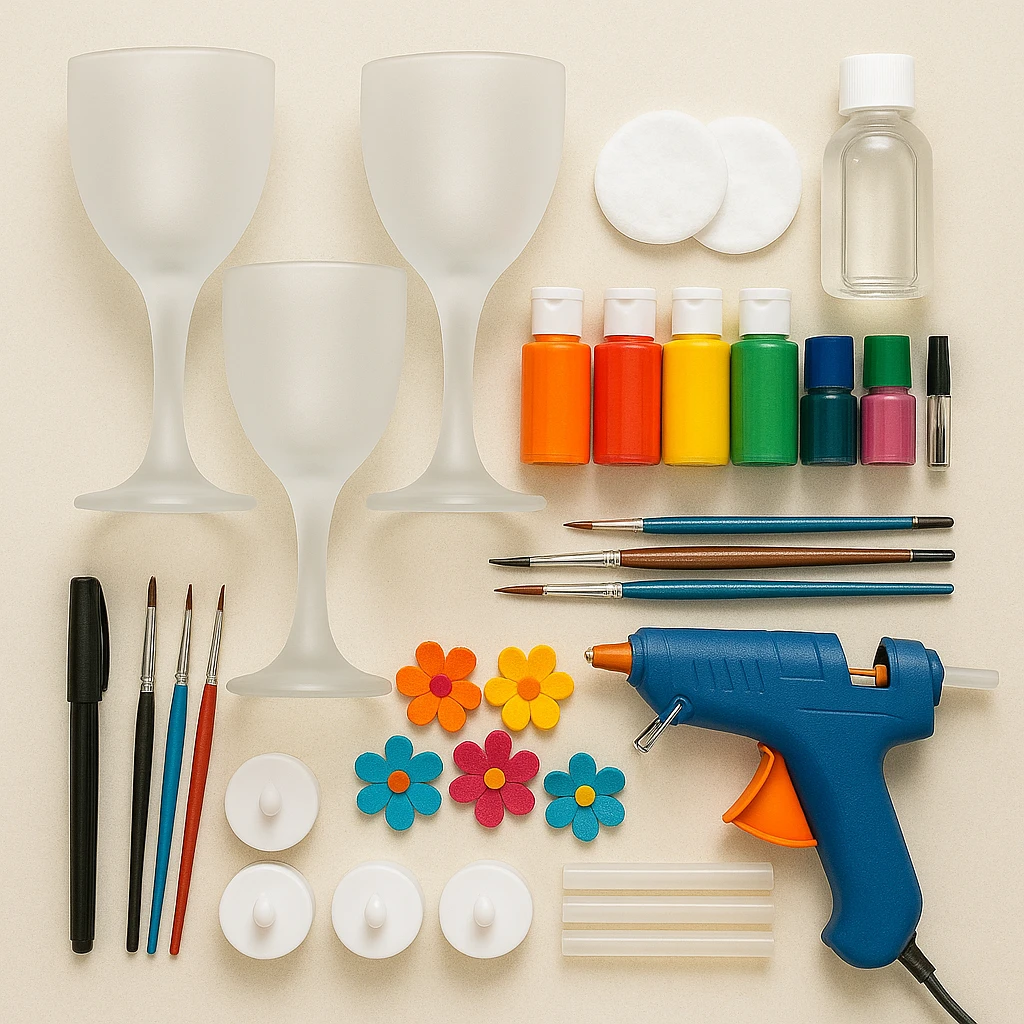
Materials Needed
- 3 frosted wine glasses (white frosted glass preferred)
- Acrylic paint or glass paint pens (black, pink, orange, yellow, blue, green)
- Fine-tipped paintbrushes or paint markers
- Pencil or glass-safe marker for sketching
- LED tealight candles (battery-operated only)
- Foam or felt flower embellishments (bright colors like orange, blue, yellow, fuchsia)
- Hot glue gun and glue sticks
- Rubbing alcohol and cotton pad (for cleaning)
- Optional: clear acrylic sealant spray
Step 1: Clean and Frost the Wine Glasses
Before beginning, clean each wine glass thoroughly with rubbing alcohol to remove any oils or residue. This helps the paint adhere better and ensures a smoother finish. If your glasses are not already frosted, you can use a frosted glass spray to create the desired texture. Let them dry completely before moving on.
Step 2: Sketch and Paint the Sugar Skull Design
Use a pencil or a glass-safe marker to lightly sketch your sugar skull face on the bowl (bottom) of each inverted wine glass. Think bold eyes, floral details, hearts, swirls, and symmetrical lines. Once your design is sketched, use acrylic paint or glass paint pens to fill in the patterns. Start with black for the eyes, nose, and mouth, then add colorful flourishes and flowers. Allow each color to dry before layering the next.
Step 3: Set the Paint
Depending on the paint used, you may need to set it by baking the glasses or letting them air dry. Follow your paint manufacturer’s instructions. For air-dry acrylics, allow at least 24 hours to fully cure. For bake-set paints, place glasses in a cool oven, heat to 350°F (175°C), and bake for 30 minutes. Turn the oven off and let the glasses cool inside completely before removing.
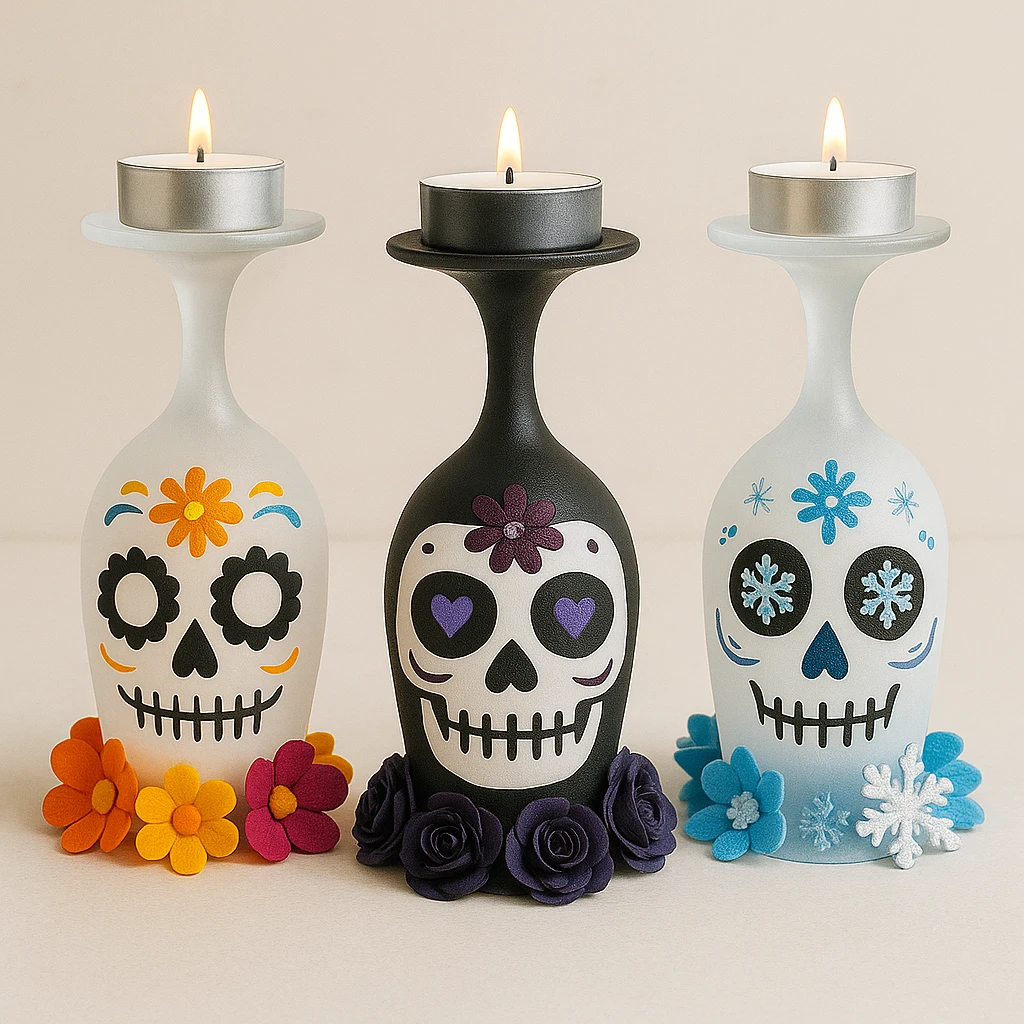
Step 4: Add Embellishments Around the Base
With your sugar skull design complete and dry, turn the glass upside down. Using a hot glue gun, attach colorful foam or felt flowers around the rim of the bowl, which now serves as the lantern’s base. Arrange them tightly for a full, festive appearance. Let the glue cool for a few minutes.
Step 5: Add the Tealight and Final Touches
Place an LED tealight candle on top of the inverted base (the foot of the wine glass). Avoid using real candles, as they can heat the glass and decorations. If desired, spray a light coat of clear acrylic sealant over the painted areas to protect the design.
Customization Ideas
Classic Día de los Muertos Style: Use traditional colors like marigold orange, bright pink, cobalt blue, and add intricate patterns and symmetrical designs reminiscent of papel picado and calaveras.
Halloween Gothic Style: Go for a more spooky and dramatic look using black, silver, and deep purple. Add miniature spider webs, bats, or even tiny faux gems for a glam-goth touch.
Winter Festive Style: Give your sugar skull lanterns a winter twist with icy blues, snowflakes, and glittery accents. Perfect for seasonal decor during the holidays with a cultural spin.
Educational or Seasonal Uses
This DIY is a hands-on way to explore cultural traditions, especially in classrooms or multicultural events. Use it as a teaching tool during Día de los Muertos to discuss heritage, remembrance, and symbolism. It also makes a creative group activity for Halloween parties or holiday craft sessions, adapting styles to fit the season.
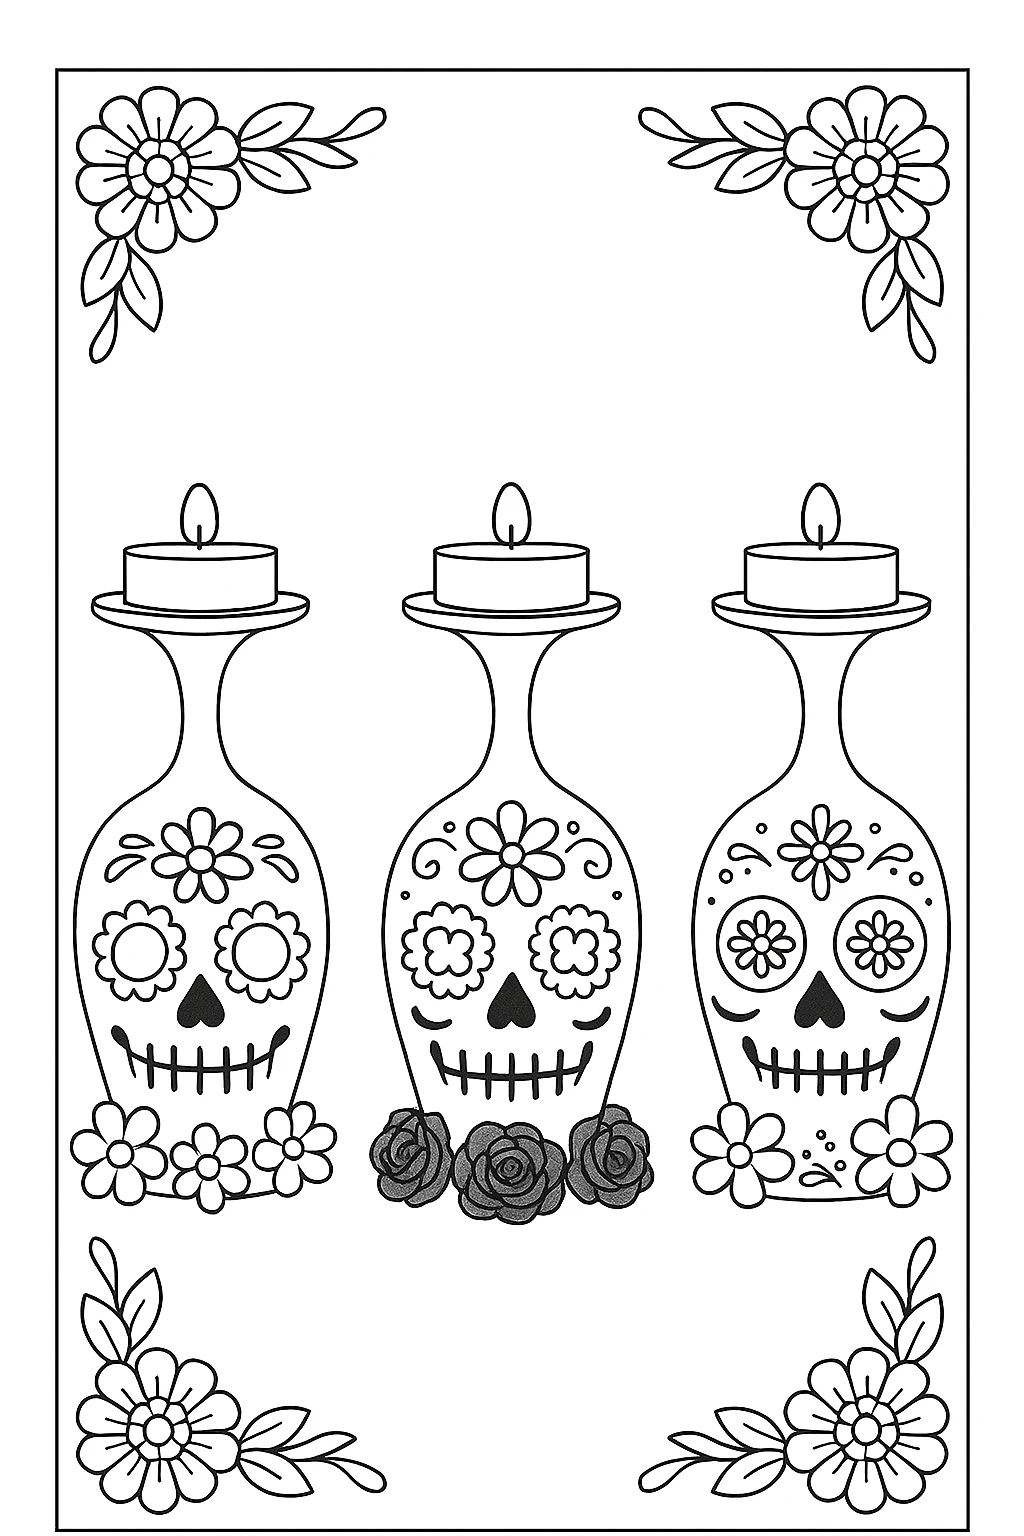
Printable Template
To make this project even easier for younger crafters or beginners, a printable sugar skull template is available. Simply print and use it as a stencil to trace your design onto the glass. You can also print extra copies for kids to color in as part of a craft session.
This template provides guidance while allowing plenty of room for personal creativity. Once colored and decorated, they serve as both inspiration and standalone art pieces.
Conclusion
Crafting Sugar Skull Lanterns from frosted wine glasses is a wonderful blend of creativity, culture, and festive decor. Whether you're celebrating Día de los Muertos, decorating for Halloween, or simply enjoying a creative afternoon, this project is easy to customize and deeply meaningful. Light them up and let your artwork shine in honor of tradition and imagination.

Sugar Skull Lantern from Frosted Wine Glasses
Equipment
- Hot glue gun
- Paintbrushes or paint markers
- Rubbing alcohol and cotton pads
Materials
- 3 Frosted wine glasses (white frosted glass preferred)
- Acrylic paint or glass paint pens (black, pink, orange, yellow, blue, green)
- Fine-tipped paintbrushes or paint markers
- Pencil or glass-safe marker for sketching
- 3 LED tealight candles battery-operated only
- Foam or felt flower embellishments bright colors like orange, blue, yellow, fuchsia
- Hot glue sticks for the glue gun
- Optional: clear acrylic sealant spray
Instructions
- Clean each wine glass thoroughly with rubbing alcohol to remove any oils or residue. Let them dry. If not already frosted, apply a frosted glass spray and let dry completely.
- Lightly sketch a sugar skull design on the bowl of each inverted wine glass. Paint the eyes, nose, and mouth in black, then add colorful flourishes using paint pens or brushes. Let each color dry before layering.
- Set the paint based on the paint instructions. For air-dry, leave for 24 hours. For bake-set, place glasses in a cold oven, bake at 350°F for 30 minutes, and let cool inside.
- With the glass inverted, use a hot glue gun to attach foam or felt flowers around the bowl's rim. Press and hold each flower until the glue cools and sets.
- Place an LED tealight on the base (foot) of the wine glass. Optionally, spray a light coat of acrylic sealant over the paint to protect your design.