
The holiday season is the perfect time to gather around the crafting table with family, hot cocoa in hand, and let creativity flow. Whether you’re decorating the classroom, creating personalized gifts, or adding homemade charm to your home, this Grinch Popsicle Stick Holiday Door Hanger brings just the right touch of mischief and fun to your festive décor. Inspired by the beloved holiday character, this easy DIY project is as joyful to make as it is to display.

Crafted from simple materials like popsicle sticks, felt, and markers, this Grinch-themed door hanger is a great activity for kids and adults alike. With just a few steps, you'll transform everyday crafting supplies into a whimsical decoration that captures the spirit of the season—and maybe even grows a few hearts along the way. Let’s get started and bring a bit of Grinchy charm to your doors this Christmas!
Materials Needed
To make your own Grinch Popsicle Stick Door Hanger, you’ll need the following supplies:
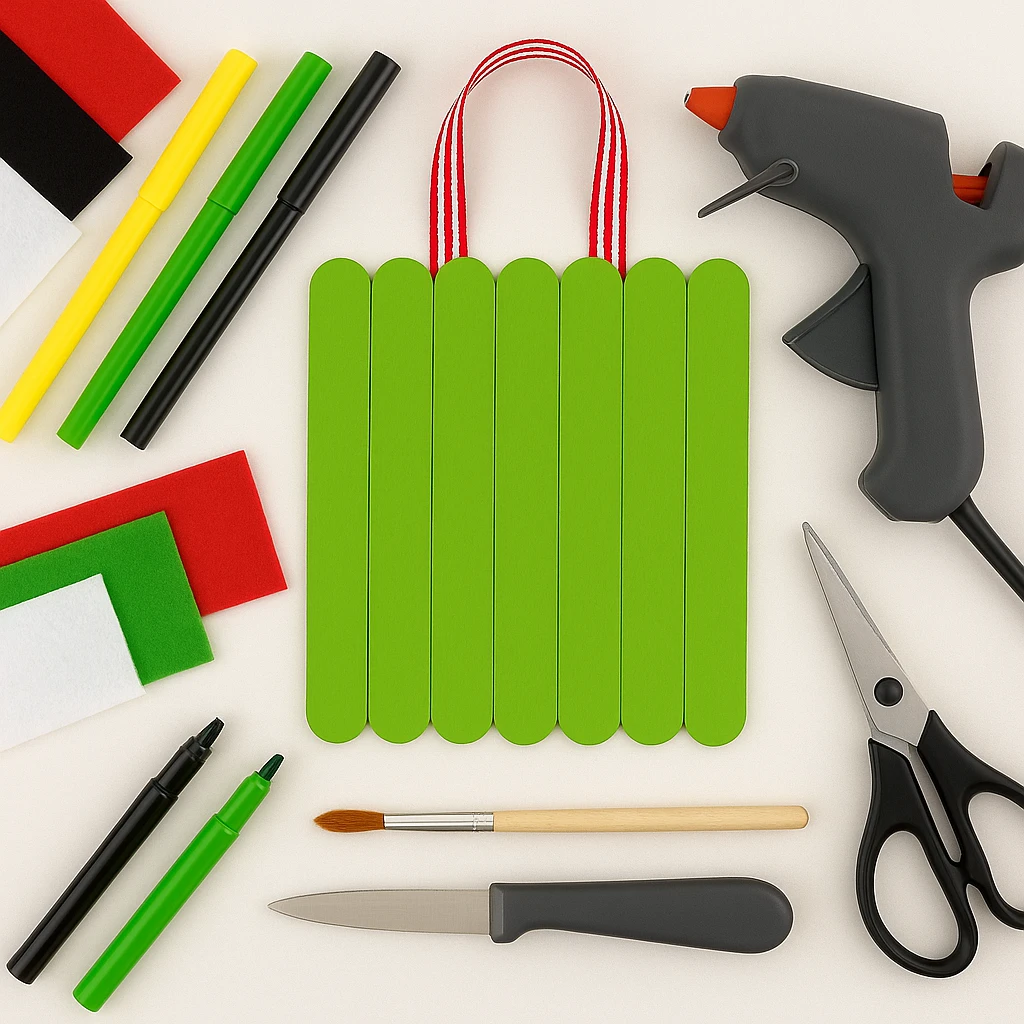
- 8 large popsicle sticks (craft sticks)
- Green acrylic paint and paintbrush
- Hot glue gun or tacky craft glue
- Red, white, black, and yellow felt sheets
- Black, yellow, and green markers
- Red and white ribbon (about 6–8 inches)
- Scissors
- Pencil (optional for sketching face)
Helpful Tip: If you're crafting with young children, consider using pre-painted sticks or washable markers for easier cleanup and more child-friendly handling.
Step-by-Step Instructions
Step 1: Paint the Popsicle Sticks
Start by painting all eight popsicle sticks with green acrylic paint. Apply an even coat on one side and allow it to dry for about 20–30 minutes. Once dry, paint the other side if both sides will be visible when hung.
Tip: Lay the sticks flat on a piece of parchment paper or a disposable surface to avoid sticking and mess.
Step 2: Assemble the Stick Base
Line up the painted sticks side by side vertically. Then, glue two additional sticks horizontally across the back to hold them together—one near the top and one near the bottom. Let the glue dry completely to ensure a sturdy base.
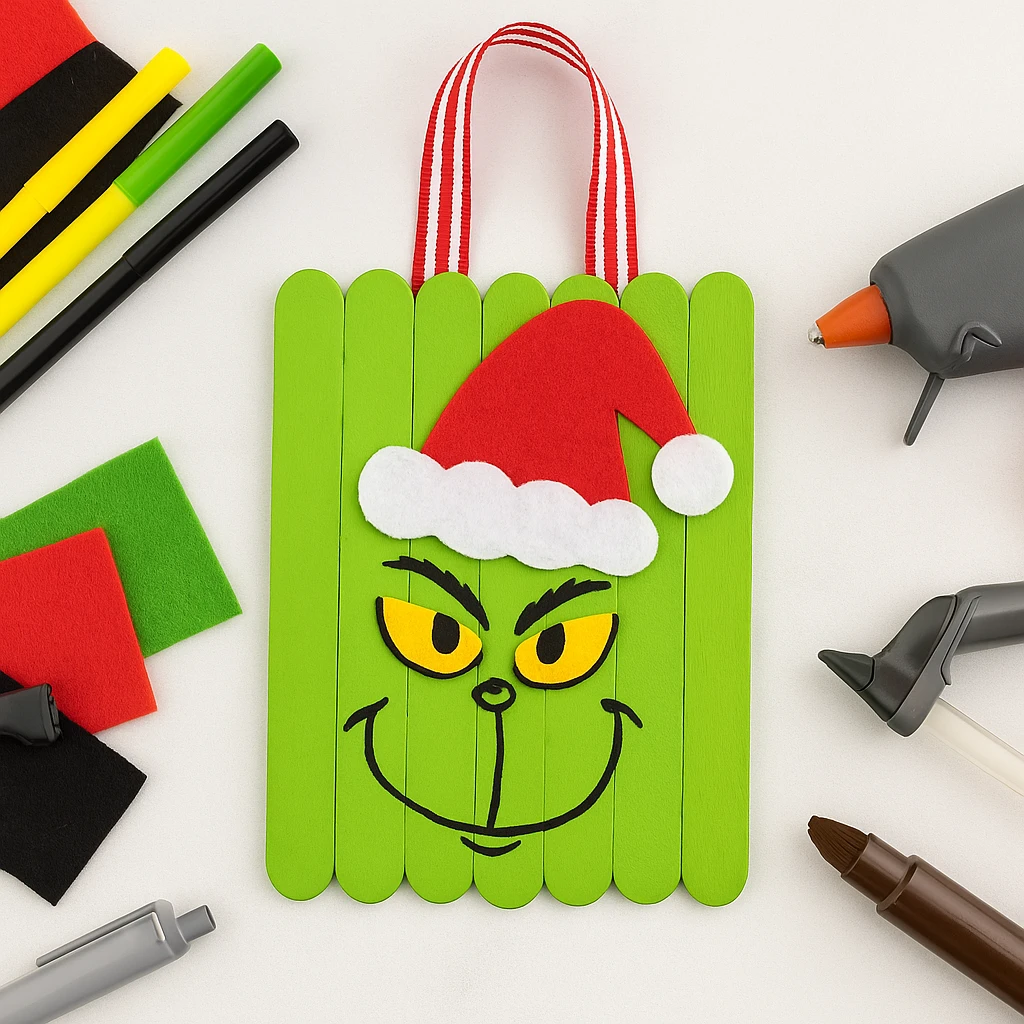
Step 3: Draw the Grinch’s Face
Using a pencil or directly with a black marker, sketch the Grinch’s iconic facial features. Add arched eyebrows, sly eyes, a small nose, and a crooked grin. Fill in the details with black and yellow markers to give it expression and pop.
Tip: If drawing isn’t your strong suit, lightly trace from a printed Grinch template first or use our printable version below!
Step 4: Make and Attach the Santa Hat
Cut a triangle from red felt to form the Santa hat. Add white felt for the brim and a fluffy pom-pom circle at the tip. Glue the hat onto the top corner of the popsicle stick base so it looks like it’s resting on the Grinch’s head.
Step 5: Add the Ribbon Hanger
Cut a piece of red-and-white ribbon and glue both ends to the back of the top of your Grinch base. This will create the loop to hang it on a door or wall. Let it dry thoroughly before hanging.
Customization Ideas
Here are a few creative ways to customize your Grinch door hanger:
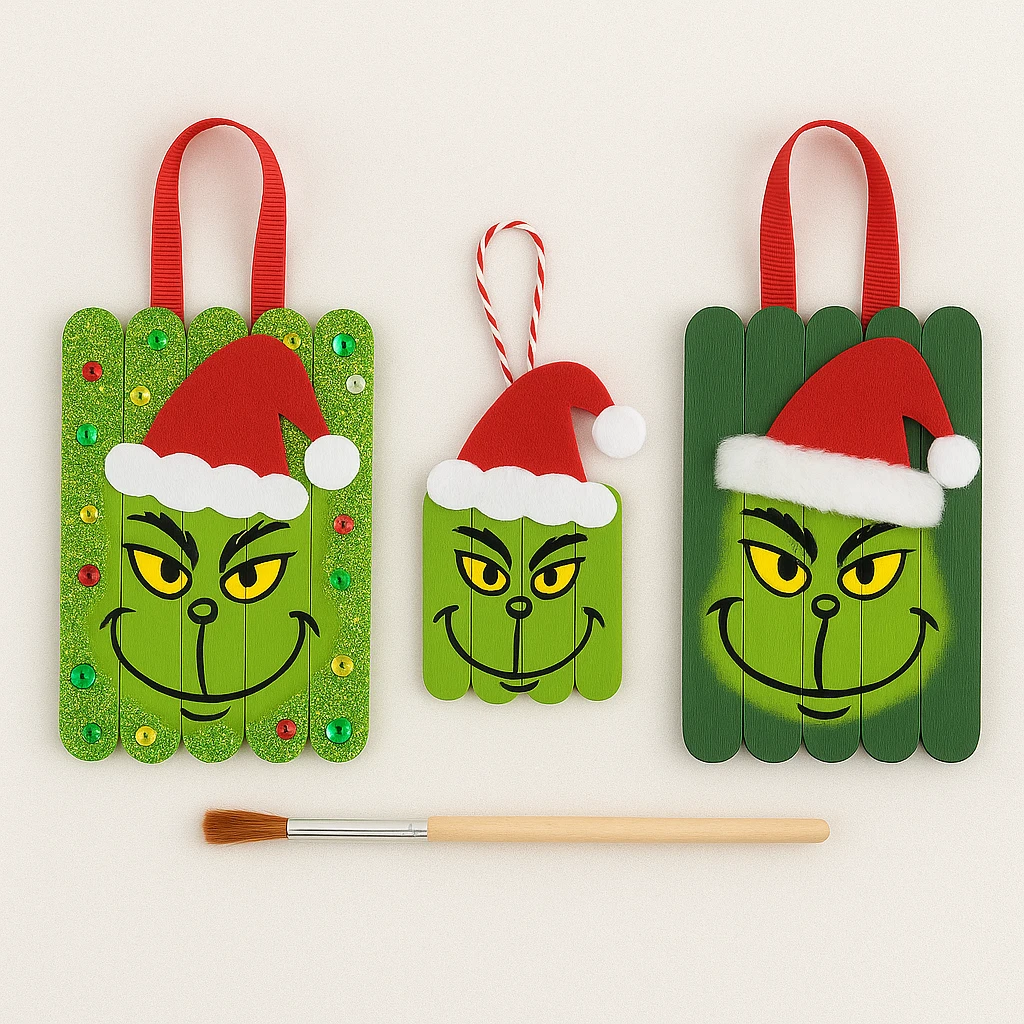
- Glittery Grinch: Add green glitter glue to the face or outline the hat with sparkly red trim for a festive shimmer.
- Mini Grinch Ornaments: Use smaller craft sticks to create miniature versions for tree ornaments or gift tags.
- Classic Movie Grinch: Use darker green paint and a faux fur trim for the Santa hat to mimic the look from the classic cartoon or movie version.
Educational or Seasonal Uses
This craft is a wonderful addition to holiday classroom activities. Pair it with a reading of How the Grinch Stole Christmas to tie in literature and art. Children can discuss emotions, kindness, and the spirit of giving while working on fine motor skills. It also works perfectly as a themed craft for holiday parties, winter break activities, or as a take-home gift from students.
You can even turn it into an advent activity—make one a day in the countdown to Christmas with different expressions or accessories added to each Grinch!
Printable Template
To make this DIY even easier, we’ve created a printable Grinch face template. Just print it out on standard paper, color it in, and cut out the face and hat shapes. These can then be glued onto your popsicle stick base to save time or help younger kids complete the project with less frustration.
You can also print several versions of the face and let kids choose the expression they like best—happy, grumpy, or somewhere in between!

Conclusion
Crafting your own Grinch Popsicle Stick Holiday Door Hanger is a delightful way to embrace holiday fun while making a memory with loved ones. With just a few supplies and some creativity, you can create a decoration that’s both whimsical and heartwarming. Hang it on your front door, gift it to a neighbor, or let it brighten a classroom wall.
Happy holiday crafting—and may your heart grow three sizes today!
Grinch Popsicle Stick Holiday Door Hanger
Equipment
- Hot glue gun
- Scissors
- Paintbrush
Materials
Main Supplies
- 8 Large popsicle sticks Craft sticks work best
- Green acrylic paint
- Red, white, black, and yellow felt sheets
- Black, yellow, and green markers
- Red and white ribbon 6–8 inches long
Instructions
- Paint all popsicle sticks green and let them dry on both sides (20–30 mins per side).
- Glue the sticks side-by-side vertically. Add two sticks horizontally across the back to secure the base.
- Draw the Grinch’s face with a pencil or marker. Fill in with black and yellow for bold features.
- Create a Santa hat using red and white felt. Glue it on the top corner of the base.
- Attach ribbon to the back of the hanger to create a loop for hanging. Let dry completely before use.