
Get ready to bring some handmade holiday cheer into your home with this delightful DIY Santa Tube Buddy! This fun and simple craft project transforms an ordinary toilet paper roll into a charming Santa Claus figure, complete with a jolly red suit, fluffy beard, and a festive paper cone hat topped with a pom-pom. Whether you're making a set for your mantel, a classroom activity, or a fun afternoon with the kids, this project is sure to bring smiles all around.

What makes this Santa Tube Buddy extra special is how easy it is to customize and create with materials you likely already have at home. Plus, it’s a fantastic way to recycle cardboard tubes while diving into the holiday spirit. With just a few pieces of colorful paper, glue, and scissors, you can bring Santa to life one roll at a time. It's a perfect project for kids aged 4 and up with adult supervision.
Let’s dive into the magic of making your own Santa buddy!
Materials Needed
To make your Santa Tube Buddy, you’ll need:
- 1 empty toilet paper roll (standard size)
- Red, white, black, peach/tan, and yellow construction paper or cardstock
- Glue stick or liquid craft glue
- Scissors
- Black marker (for optional facial details)
- 1 small white pom-pom (for the hat tip)
- Optional: Googly eyes instead of paper ones

Step-by-Step Instructions
Step 1: Prepare the Tube Base
Start with a clean, empty toilet paper roll. If needed, trim any frayed edges so the tube stands evenly. This will be the foundation for your Santa.
Step 2: Wrap with Skin-Tone Paper
Cut a piece of peach or tan paper large enough to wrap around the top half of the tube. This will be Santa's face. Apply glue to the back and wrap it around the tube, pressing firmly to secure.
Step 3: Craft and Attach the Santa Suit
Cut a piece of red paper to wrap around the bottom half of the tube. This will be Santa’s coat. Glue it in place. For the coat trim, cut out a strip of white paper and glue it along the bottom edge of the red suit, adding white paper circles to resemble fur trim if desired.
Step 4: Create the Face Details
Cut two small white circles for eyes and use a black marker to add pupils, or glue on googly eyes. Cut two red paper circles for cheeks and a small pink or red oval for the nose. Glue all the pieces onto the face area.
Step 5: Build and Attach the Beard and Mustache
Cut a large beard shape out of white paper and glue it just below the nose. Add a separate white mustache piece over the top center of the beard for a layered look. You can also cut the beard into wavy shapes for extra character.
Step 6: Add the Belt and Buttons
Cut a strip of black paper for Santa’s belt and wrap it around the middle of the red coat. Add a yellow square buckle in the center. Optionally, glue on small paper dots or use a marker to draw buttons down the front of the suit.
Step 7: Make the Cone Hat
To make Santa’s signature hat, cut a quarter-circle from red paper and roll it into a cone. Secure the edge with glue. Cut a white strip to form the base of the hat and glue it around the bottom of the cone. Add a white pom-pom to the tip.
Step 8: Attach Hat and Final Touches
Glue the hat on top of the tube. Let everything dry completely. Once dry, check if any pieces need more glue and touch up the edges as needed.
Customization Ideas
- Santa Around the World: Use different skin tones and suit colors to represent Santa from various cultures, such as blue for Russian Ded Moroz or green for Celtic folklore.
- Elf Tube Buddy: Use green paper instead of red, add pointy ears and a jingle bell instead of a pom-pom to create a matching elf buddy.
- Mini Gift Holder: Before sealing the top with the hat, tuck a small candy or rolled-up note inside. Great as a party favor or classroom treat!

Educational and Seasonal Uses
This Santa Tube Buddy project is perfect for combining creativity with learning. It teaches children about recycling, fine motor skills, and holiday traditions across cultures. Use it in classrooms to kick off holiday-themed units or in home-schooling sessions about global celebrations.
They also make lovely handmade decorations for Christmas trees, mantel displays, or tabletop centerpieces. Use them for holiday fairs, story props, or DIY advent calendars by making 24 numbered versions!
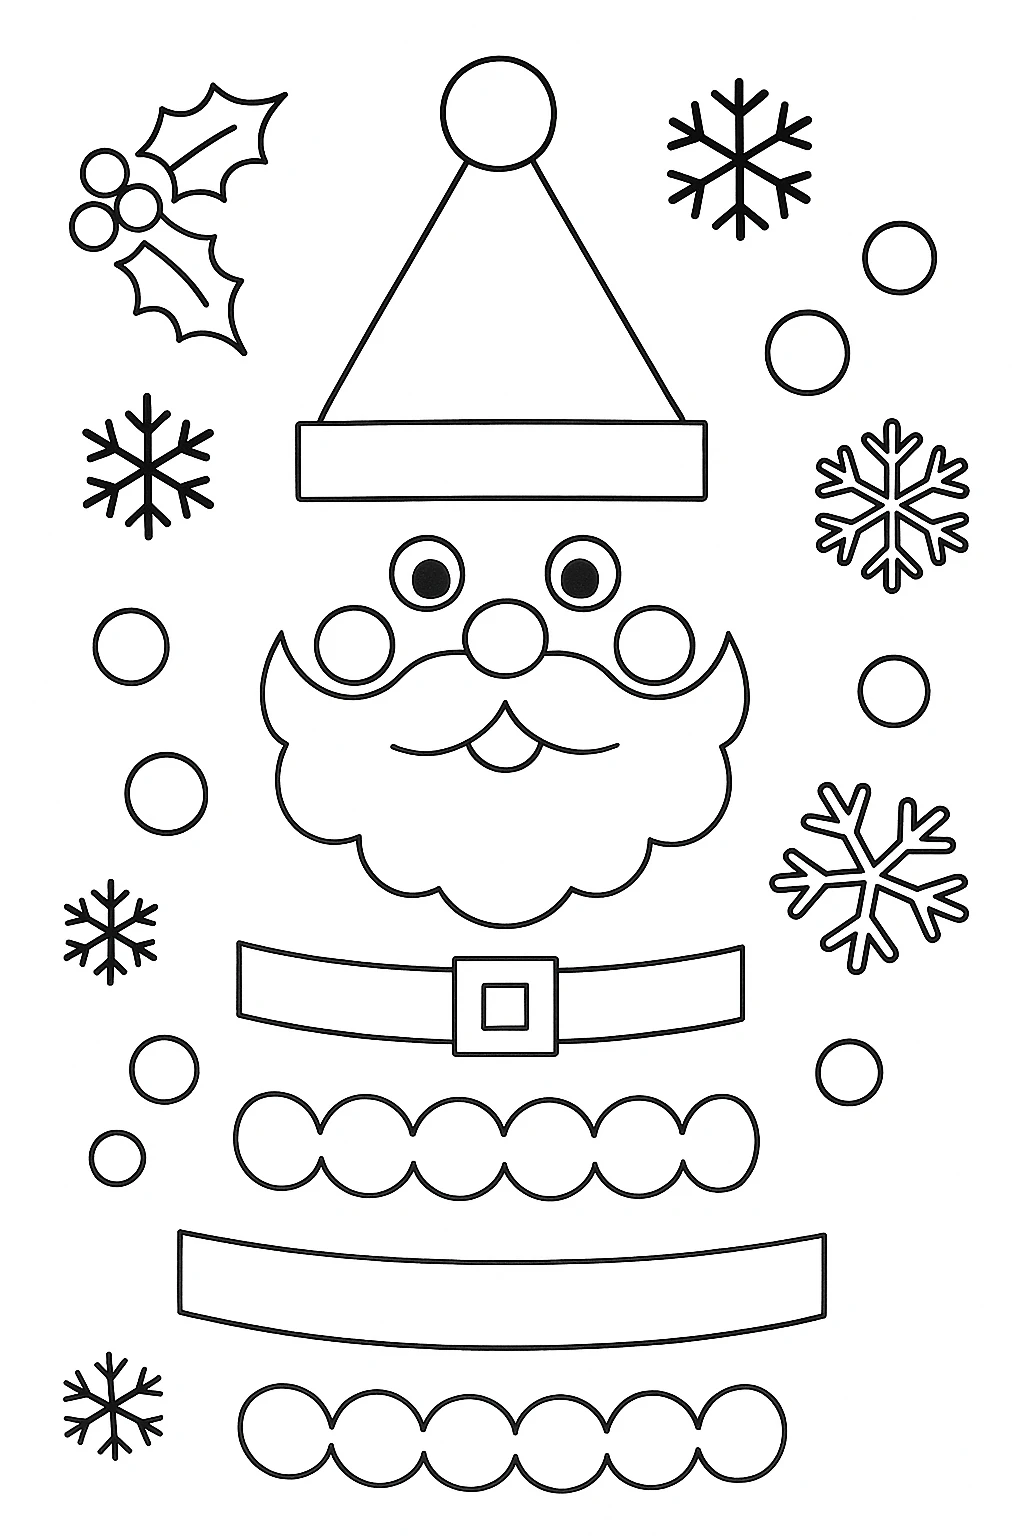
Printable Template
To make this project even easier for young crafters, we’ve included a ready-to-print coloring template. All the parts of the Santa Tube Buddy—from the hat to the beard—are laid out and ready to cut. Just print on white cardstock, color with crayons or markers, cut the pieces out, and glue them together following the instructions above.
This is a great option for classrooms or group activities where preparing individual pieces can save time and let kids focus on the fun part—coloring and building their Santa!
Conclusion
The DIY Santa Tube Buddy is a joyful and budget-friendly project that’s sure to become a favorite holiday tradition. It’s easy enough for kids, fun enough for family craft nights, and customizable for all kinds of festive creativity. With just a few supplies and a little imagination, you can turn recycled tubes into merry Santa decorations that bring the spirit of the season to life.
Give it a try this winter and don’t forget to make a few extra for gifting or setting up a whole Santa squad!

DIY Santa Tube Buddy With a Festive Paper Cone Hat
Equipment
- Scissors
- Glue stick or craft glue
- Black marker
Materials
- 1 Empty toilet paper roll
- Red, white, black, peach/tan, and yellow craft paper
- 1 Small white pom-pom For the hat tip
- Optional: Googly eyes
Instructions
- Start with a clean, empty toilet paper roll. If needed, trim any frayed edges so the tube stands evenly.
- Cut a piece of peach or tan paper large enough to wrap around the top half of the tube. Glue it in place.
- Wrap the bottom half of the tube with red paper for Santa’s coat. Add a white strip and paper circles to resemble fur trim.
- Create facial features using small paper circles or googly eyes. Add cheeks and nose with red or pink paper.
- Cut and glue a white beard shape below the nose. Add a mustache piece over the top for extra dimension.
- Cut and attach a black belt with a yellow buckle around Santa’s coat. Add paper buttons if desired.
- Make a red cone hat from a quarter-circle of paper. Add a white base trim and glue on a pom-pom at the tip.
- Glue the finished hat onto the top of the tube. Let everything dry and touch up any loose edges.