
Día de los Muertos, or Day of the Dead, is a colorful and meaningful celebration that honors the lives of loved ones who have passed. Traditionally celebrated in Mexico and other Latin American countries, this holiday brings people together with food, music, vibrant altars, and creative decorations. One of the most iconic symbols of Día de los Muertos is the sugar skull, which represents the beauty and celebration of life.
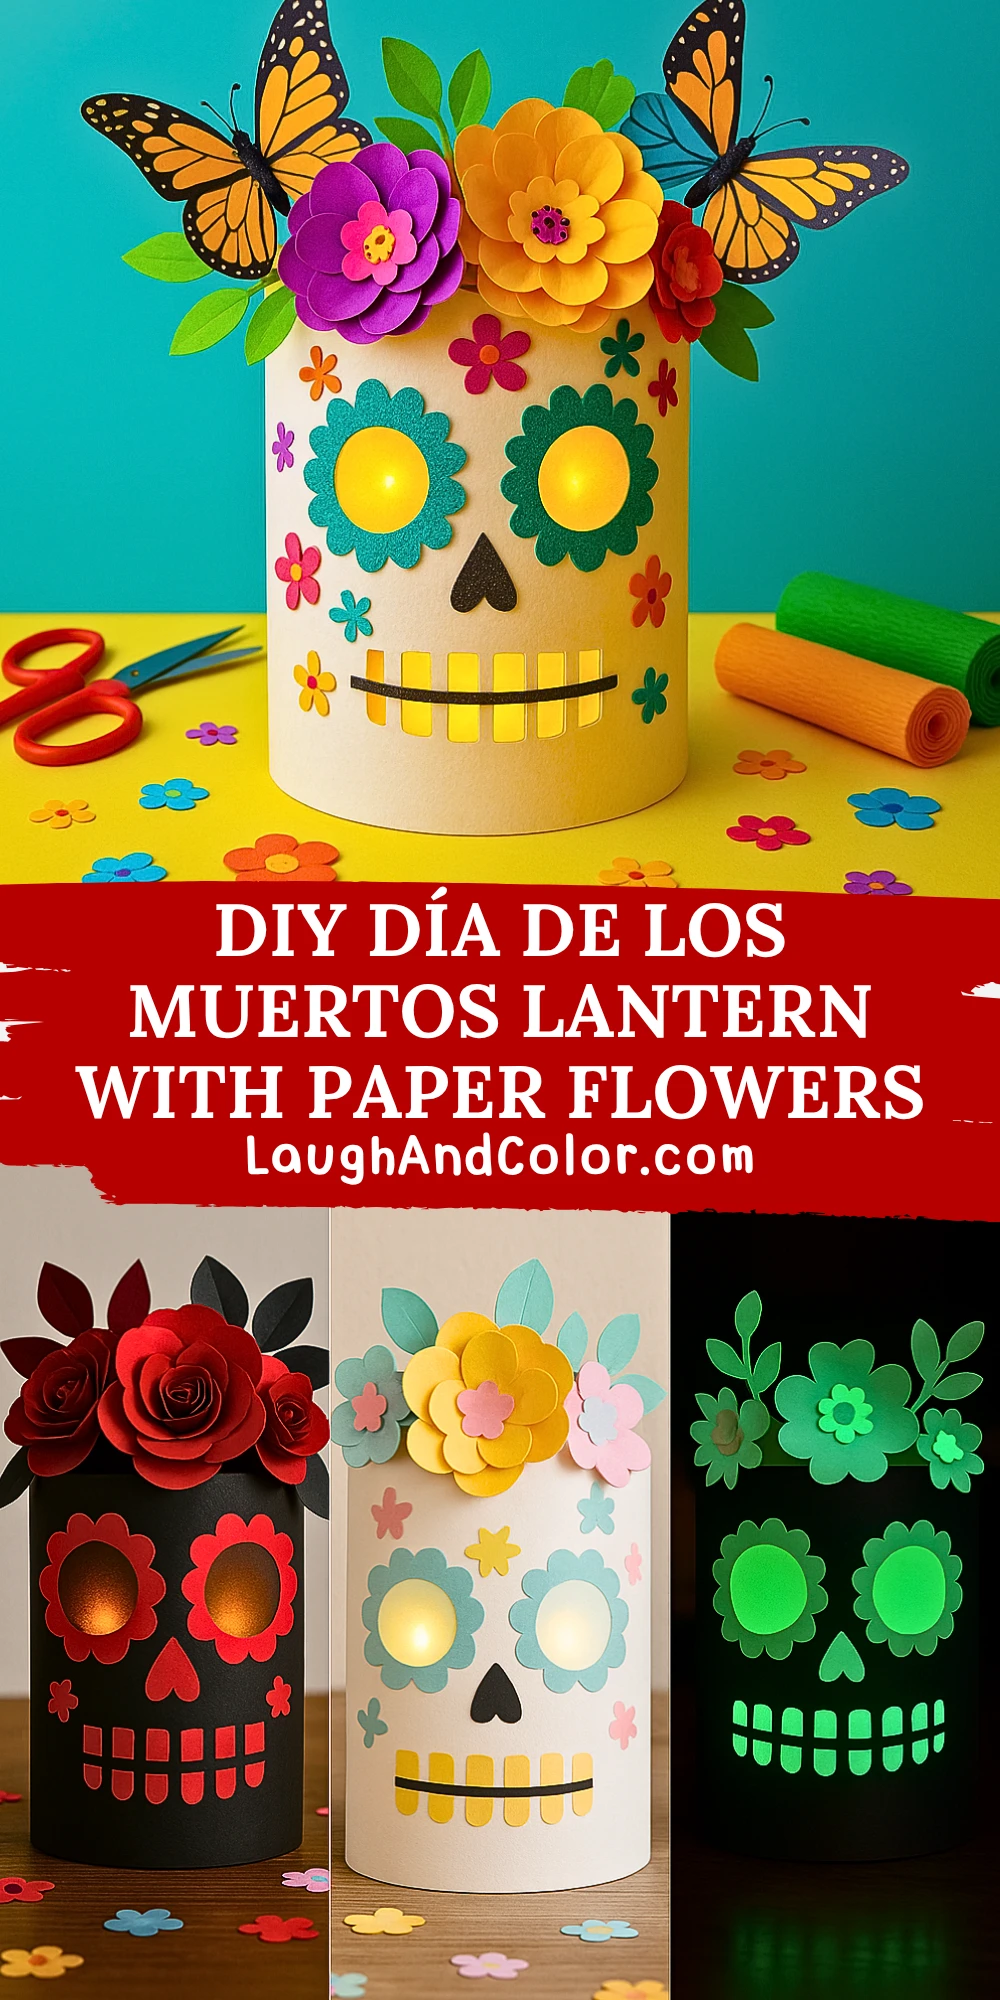
This DIY lantern project brings the festive spirit of the holiday into your home with a glowing sugar skull design, bright paper flowers, and fluttering butterflies. It’s the perfect craft for kids and adults alike, whether you're decorating for a party, building an altar (ofrenda), or teaching a classroom about the holiday's traditions. Easy to make with basic materials and a printable template, this lantern is both beautiful and meaningful.
Materials Needed
- White cardstock or construction paper (for the lantern base)
- Black paper (for mouth, nose, and outlines)
- Colored paper (for flowers, eyes, and embellishments)
- Crepe paper (optional for texture)
- Scissors
- Craft glue or glue stick
- Battery-operated LED tealight or fairy lights
- Pencil
- Ruler
- Printable skull and flower template (see section below)

Helpful Tip: Use thicker cardstock for the base to ensure your lantern stands upright and holds its shape once the LED light is inside.
Step-by-Step Instructions
Step 1: Create the Skull Lantern Base
Measure and cut a rectangle of white cardstock approximately 8 inches tall and 11 inches wide. Roll the paper into a cylinder shape and glue the edges together. This forms the structure of your lantern.
Tip: You can secure the base with tape temporarily while the glue dries to keep its shape.
Step 2: Cut Out the Facial Features
Using the template or drawing freehand, cut out eyes, nose, and mouth from colored and black paper. Popular sugar skull designs include flower-shaped eyes and a stitched or toothy smile. Glue them onto the lantern base in a sugar skull pattern.
Step 3: Add the Colorful Paper Flowers
To make paper flowers, cut colored paper into petal shapes and layer them in circular arrangements. Glue them at the top edge of the lantern to create a floral crown. Use a mix of bright colors like orange, purple, and yellow to reflect the vibrant holiday.
Helpful Tip: Curl the petal edges slightly with a pencil to add dimension.
Step 4: Attach Butterflies and Leaves
Cut butterfly shapes from orange paper and decorate with black marker or construction paper to resemble monarch butterflies, which are closely associated with Día de los Muertos. Add paper leaves around the flowers to complete the crown.
Step 5: Add the LED Candle Inside
Place a battery-operated LED tealight or a small set of fairy lights inside the lantern. This gives the lantern a warm glow that brings the sugar skull to life.
Safety Note: Do not use real candles or open flames with this paper craft.
Step 6: Final Assembly and Details
Check all glued pieces for security and adjust any details. Add small decorative flowers, stars, or hearts around the skull for extra flair. Let everything dry completely before displaying.
Customization Ideas
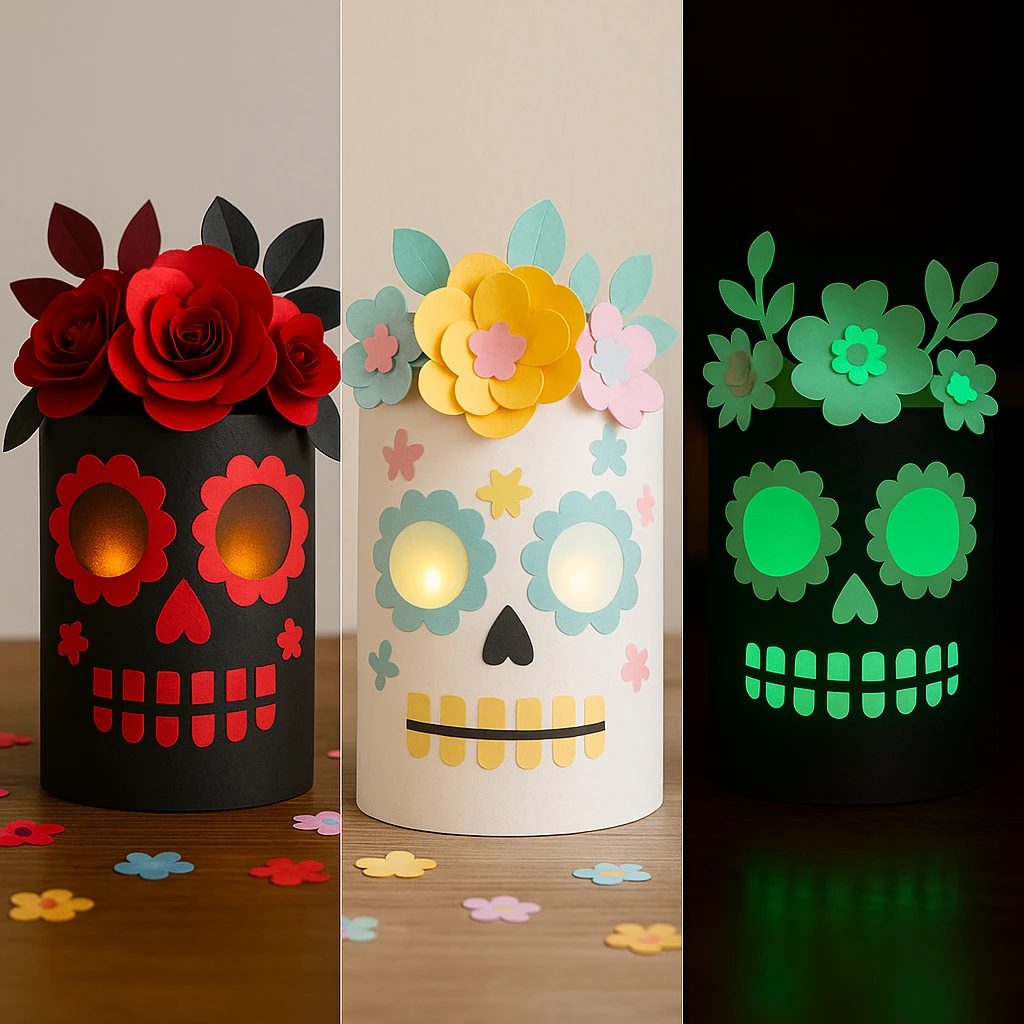
1. Gothic Style Lantern
Use black paper as the base with silver or red details for a more dramatic look. Add lace-inspired cutouts or rhinestones for a spooky elegance.
2. Pastel Kids' Version
Swap bright hues for pastel tones like soft pink, mint, and lavender. Use googly eyes or stickers to make it fun for younger kids.
3. Glow-in-the-Dark Lantern
Use glow-in-the-dark paper or stickers for the facial features and flowers. Charge under light, then let it shine in the dark.
Educational or Seasonal Uses
This craft makes a fantastic classroom project during Hispanic Heritage Month or while studying Mexican culture. It also works as a meaningful decoration for community events, family gatherings, or home altars during Día de los Muertos. Educators can pair this activity with lessons about the holiday’s symbols and history.
Printable Template
To simplify the crafting process, we’ve included a printable template featuring a sugar skull face and several flower shapes. Just print the template on standard 8.5" x 11" paper or cardstock. Kids can color the pieces before cutting them out, making this craft even more engaging.
You can print the designs on white paper and color them in with markers or crayons. Or, use the template as a cutting guide to trace shapes onto colored paper for layering.

Conclusion
Creating your own Día de los Muertos Lantern is a heartfelt way to celebrate the holiday's spirit. With glowing eyes, vibrant flowers, and symbolic butterflies, this lantern brings beauty and tradition into your space. Whether you're making it at home or in the classroom, it's a wonderful way to honor culture and creativity at the same time.
DIY Día de los Muertos Lantern with Paper Flowers
Equipment
- Scissors
- Glue stick or craft glue
- Ruler
- Pencil
Materials
Main Materials
- White cardstock or construction paper for lantern base
- Black paper for facial details
- Colored paper for flowers and embellishments
- Crepe paper optional for added texture
- Battery-operated LED tealight or fairy lights for lighting the lantern
- Printable sugar skull and flower template for easy crafting
Instructions
- Measure and cut an 8"x11" rectangle from white cardstock. Roll into a cylinder and glue the edges to form the base.
- Cut out eyes, nose, and mouth using colored and black paper. Use template or draw your own. Glue onto the lantern.
- Make paper flowers by layering petal shapes cut from colored paper. Glue around the top edge of the lantern.
- Create monarch butterflies using orange paper and black details. Add leaves and place around the flower crown.
- Insert a battery-powered LED candle or fairy lights inside the lantern for a warm glow.
- Add small embellishments like paper hearts, stars, or mini flowers. Let everything dry before use.