
As autumn colors burst across the trees and Thanksgiving approaches, it's the perfect time to slow down with a meaningful craft that celebrates family, gratitude, and the season's charm. This Autumn Harvest Turkey Lantern with a Photo Window is a delightful DIY project that combines creativity and personalization. Whether it's for your holiday table centerpiece or a classroom keepsake, this lantern craft is sure to light up smiles.
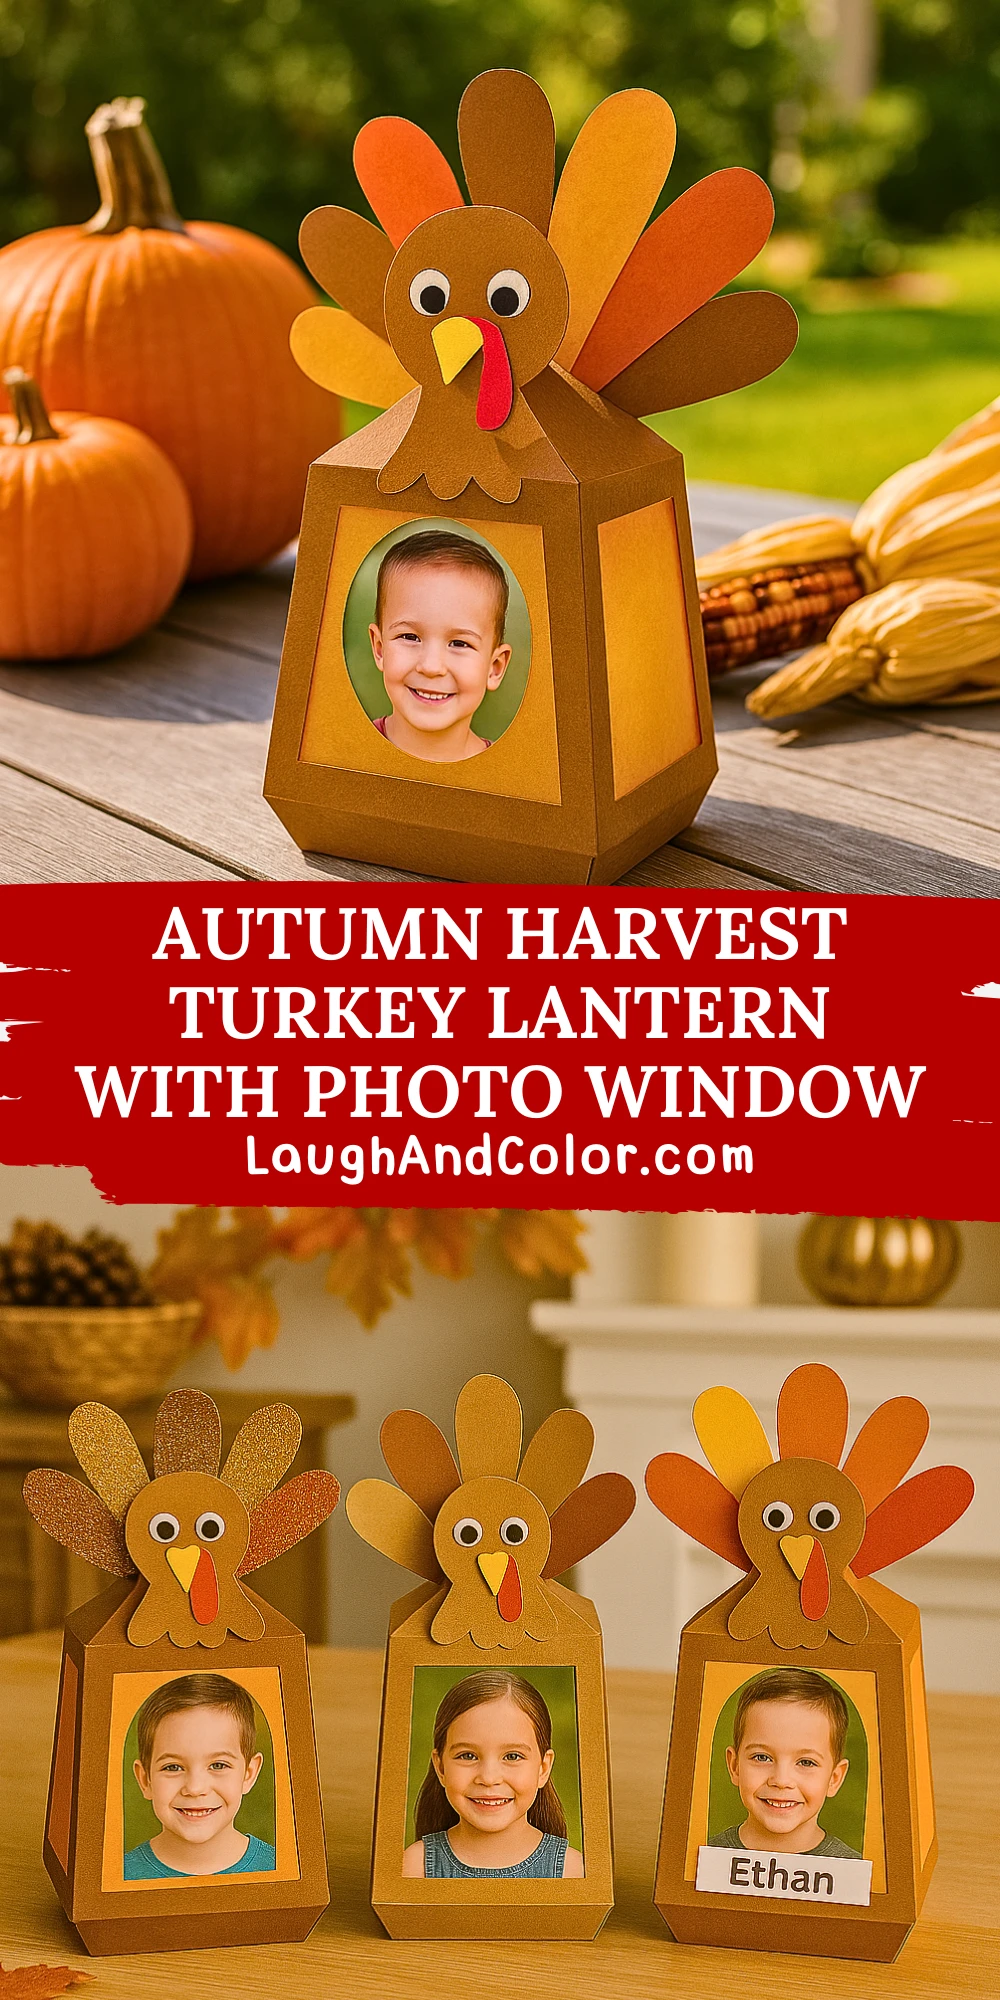
This project is ideal for kids and adults to work on together. Not only does it involve cutting, gluing, and assembling cheerful turkey parts, but it also lets you showcase a cherished photo — making it a perfect memory marker. Once complete, the lantern can be placed in windows, used as festive décor, or even lit gently with an LED tea light to create a warm autumn glow.
Materials Needed
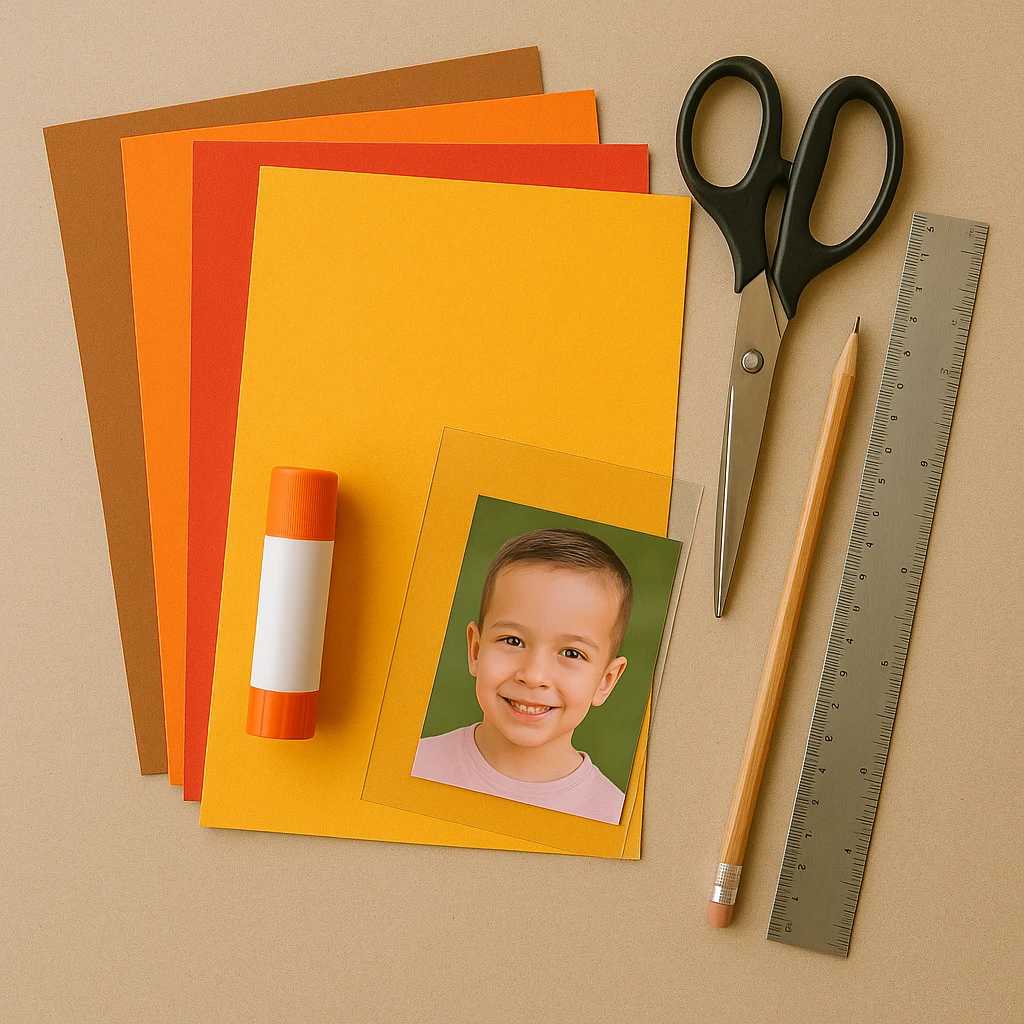
To make your own Turkey Lantern with a photo window, gather the following materials:
- Brown, orange, red, and yellow cardstock (12x12 size works best)
- Scissors or craft knife
- Ruler and pencil
- Glue stick or tacky glue
- Double-sided tape (optional)
- Clear acetate sheet (for photo cover)
- Printed photo (about 3x4 inches)
- Googly eyes or black marker
- Battery-operated LED tea light (optional)
Tip: If you're working with a group or young children, pre-cutting some elements like feathers or face parts can speed up the process and reduce the mess.
Step 1: Prepare the Lantern Base
Start by creating the box structure that forms the lantern. Cut your brown cardstock into four 5x6 inch rectangles. These will be the walls. Cut out a square base measuring 5x5 inches. Use glue or double-sided tape to connect the four sides to the base, forming a box.
Once the walls are attached, gently score the top edges for a fold-over flap if desired. This helps with structure and finishing.
Step 2: Cut Out the Photo Window
Choose one side of your lantern box to feature the photo. Measure and cut out an oval or rectangle roughly 3x4 inches from the center of that wall. Cut a piece of clear acetate slightly larger than the opening and glue it on the inside. Then, tape or glue your printed photo behind the acetate.
Helpful Tip: Make sure the photo is facing out and centered. If using a school or class photo, double-check orientation before gluing.
Step 3: Design and Attach the Turkey Feathers
Cut out 6 to 8 feather shapes from orange, red, and yellow cardstock. Each feather should be about 1x4 inches. Arrange them in a fan shape and glue them to the back top edge of the lantern wall, so they peek out like a turkey’s tail.
For extra durability, overlap and glue the base of each feather before attaching them to the lantern.
Step 4: Make the Turkey Face and Details
Create a circle for the turkey's head from brown cardstock (about 3 inches wide). Add googly eyes or use a black marker to draw them. Cut a small yellow triangle for the beak and a red wattle shape. Glue these features to the face.
Attach the completed face to the front top portion of the lantern, just above the photo window. Let everything dry completely.
Step 5: Assemble the Lantern and Add Light (Optional)
Once all decorations are set, do a final check for glue spots or loose parts. Place an LED tea light inside the lantern for a soft glow — never use a real candle. If you'd like, you can close the top with a piece of cardstock or leave it open for easy lighting.
Customization Ideas
1. Personalized Name Tag
Add a small banner or label with the child’s name or a Thanksgiving message like "Grateful for You" under the photo window.
2. Glittery Glam Turkey Feathers
Decorate each feather with a line of glitter glue or metallic markers for sparkle that catches the light.
3. Rustic Autumn Palette
Use kraft paper and muted tones like burgundy, mustard, and burnt orange for a more natural and rustic aesthetic that blends into farmhouse-style decor.

Educational or Seasonal Uses
This craft is a great addition to Thanksgiving classroom lessons. Teachers can tie it into discussions about gratitude, family, or the history of Thanksgiving. It also doubles as a memorable keepsake when students insert their own photo and bring it home. Families can use the lantern as a centerpiece for Thanksgiving dinner, allowing each child to display their creation proudly.
You can also turn this into a gratitude lantern by writing thankful notes on each side or feather.
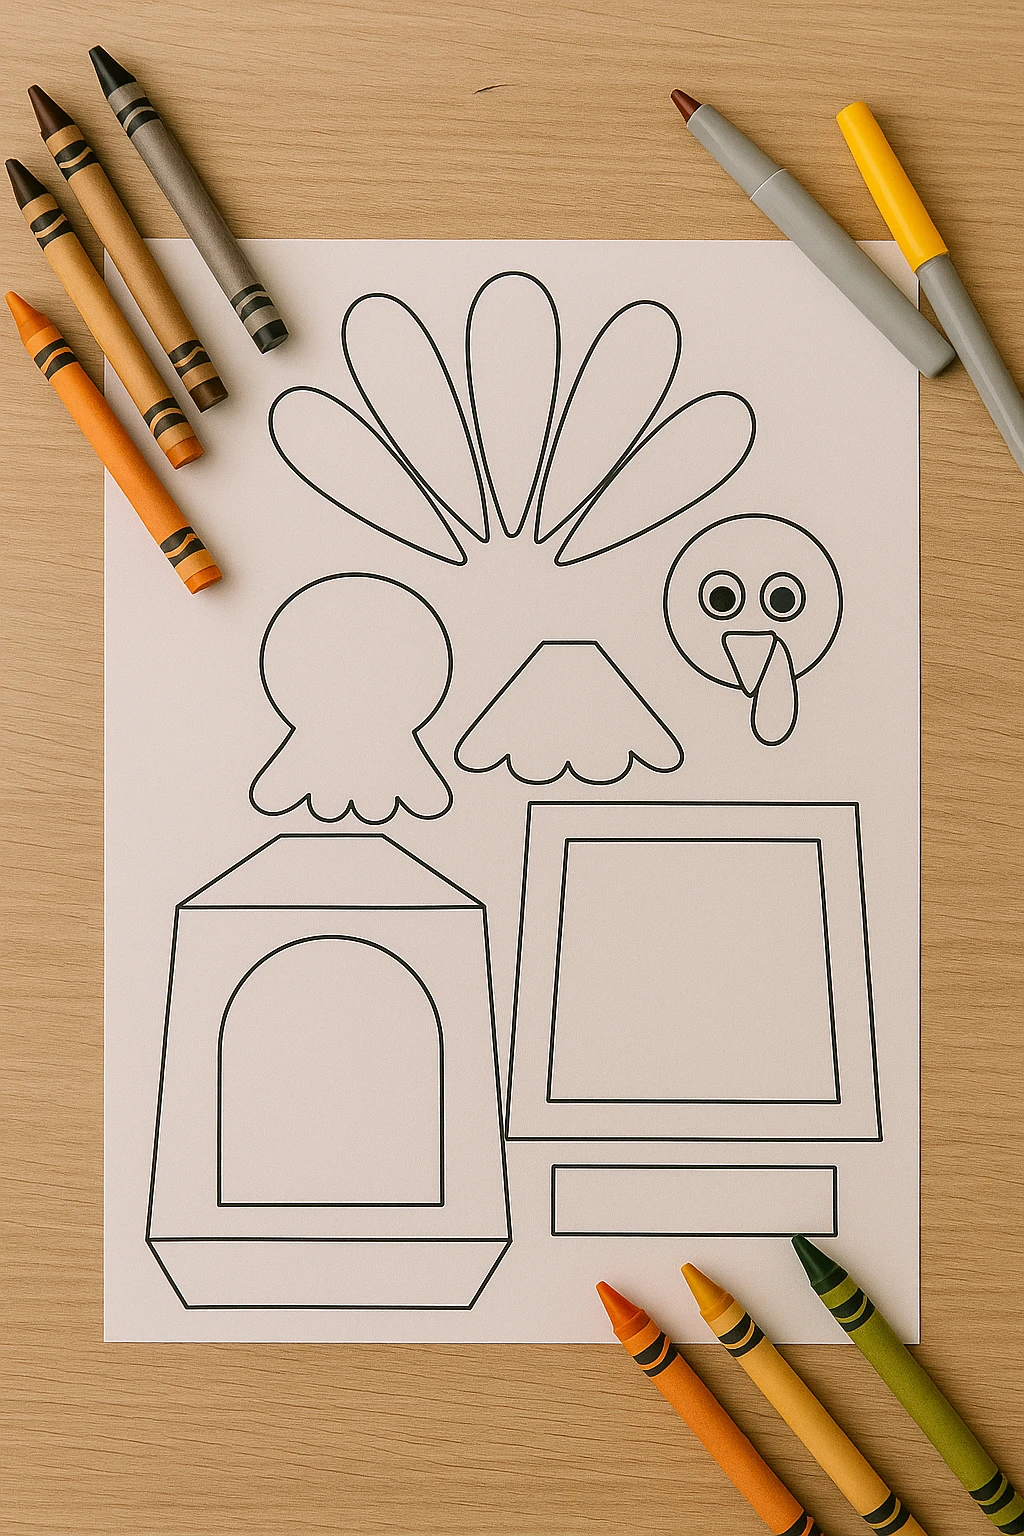
Printable Template
To make crafting easier, we've included a printable template you can use to cut out all the shapes needed for this turkey lantern. The template includes outlines for the lantern box, feather shapes, turkey face, beak, and window cutout.
Simply print it out on cardstock, color the pieces if desired, cut along the edges, and assemble as described. With minimal effort and prep, you'll have a ready-to-go Thanksgiving craft that’s perfect for kids, classrooms, or cozy craft nights.
Conclusion
Creating this Autumn Harvest Turkey Lantern with a Photo Window is more than just a seasonal activity — it’s a way to craft lasting memories and celebrate the warmth of the season. With a mix of creativity, family focus, and holiday spirit, this DIY project brings personal charm to your fall décor. Try it this Thanksgiving and enjoy the glowing results!

Autumn Harvest Turkey Lantern With Photo Window
Equipment
- Scissors or craft knife
- Glue stick or tacky glue
- Double-sided tape (optional)
- Ruler and pencil
Materials
Main Materials
- Brown, orange, red, and yellow cardstock 12x12 size recommended
- Clear acetate sheet for covering the photo window
- Printed photo approximately 3x4 inches
- Googly eyes or black marker for turkey eyes
- Battery-operated LED tea light optional for glow effect
Instructions
- Cut four 5x6 inch rectangles and one 5x5 inch square from brown cardstock to make the lantern walls and base. Assemble into a box shape using glue or double-sided tape.
- Choose one lantern wall and cut a 3x4 inch window in the center. Glue a clear acetate sheet behind the opening, then tape or glue a printed photo behind the acetate.
- Cut 6–8 feathers from orange, red, and yellow cardstock (each about 1x4 inches). Arrange them in a fan shape and glue them to the back top edge of the lantern.
- Create a 3-inch wide circle for the turkey's face. Add googly eyes, a yellow triangle beak, and red wattle. Glue the face above the photo window on the front panel.
- Once decorations are dry, place an LED tea light inside the lantern. Optionally cover the top with cardstock or leave open for easy lighting.