
If you're feeling a little mischievous this holiday season, this DIY Grinch Paper Plate Holiday Wreath is the perfect project to get into the spirit—Grinch style! Inspired by everyone's favorite green holiday character, this craft turns simple materials into a fun, festive decoration that’s sure to bring smiles (and maybe a few cheeky grins). It's a great way to get creative with your kids, spruce up your classroom, or add a playful touch to your holiday décor.

This craft is budget-friendly and easy to make, even for young crafters. It’s also a great activity for family holiday nights, preschool classrooms, or church groups. With only basic materials like a paper plate, cotton balls, and some red pom-poms, you can create a Grinch face that’s both funny and festive. Plus, it makes a wonderful keepsake to hang on a door, fridge, or bulletin board all season long.
Let’s get started on this whimsical holiday wreath!
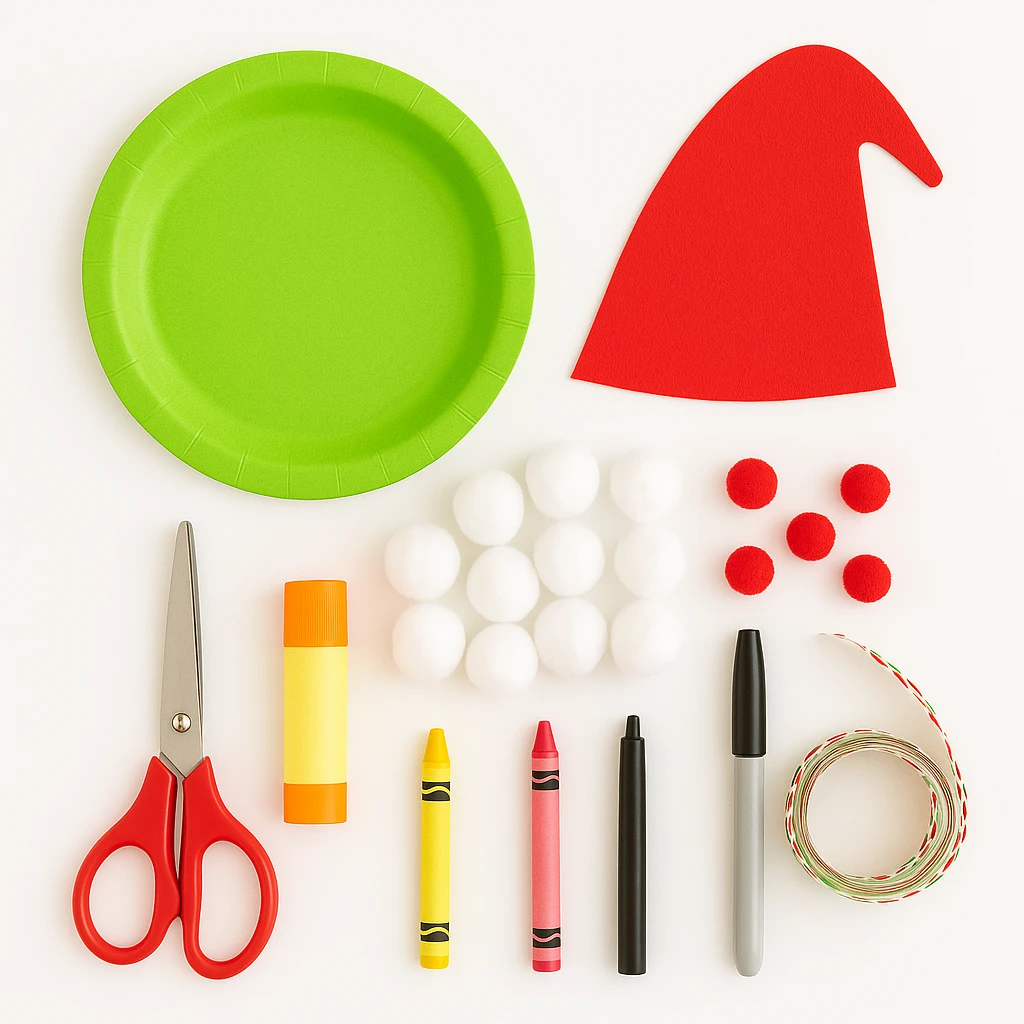
Materials Needed
- 1 green paper plate (standard size)
- Red craft foam or red felt sheet (for the Santa hat)
- Cotton balls (around 12-15)
- Red mini pom-poms or red craft beads (about 10)
- Glue stick or craft glue
- Scissors
- Black permanent marker
- Yellow crayon (for Grinch eyes)
- Optional: pink crayon (for cheeks), ribbon for hanging
Step-by-Step Instructions
Step 1: Prepare the Paper Plate Base
Start by laying your green paper plate flat. This will serve as the Grinch’s face. If you only have white paper plates, you can color the surface green with paint or crayons before continuing.
Step 2: Draw or Attach the Grinch Face
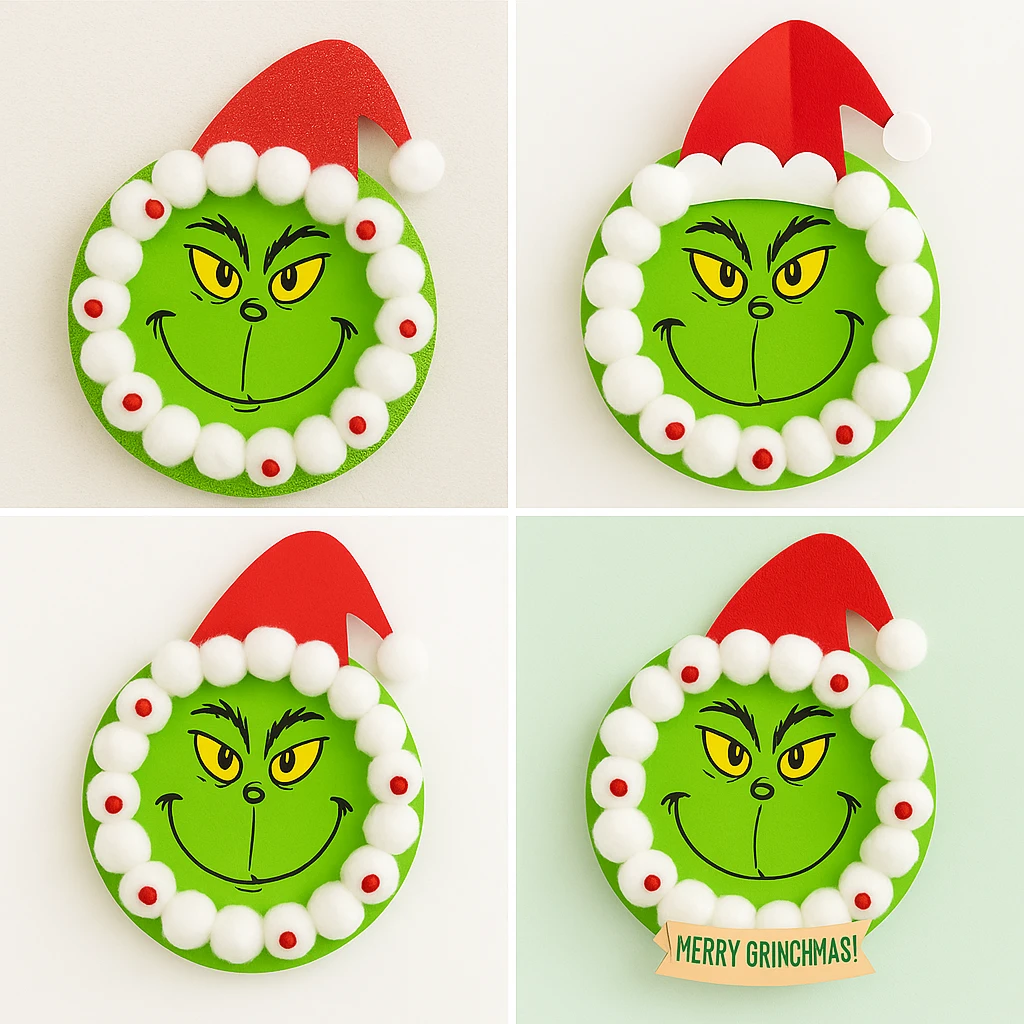
Using a black permanent marker, carefully draw the Grinch’s facial features—arched eyebrows, mischievous smile, nose, and eye outlines. Fill in the eyes with a yellow crayon to match the classic Grinch look. Add a hint of pink to the cheeks for a bit of extra character, if you’d like.
Step 3: Make and Attach the Santa Hat
Cut a triangle shape out of red craft foam or felt to create a Santa hat. Curve the bottom edge slightly to fit the plate’s contour. Glue it onto the top side of the paper plate. Add a small cotton ball to the tip of the hat and a few more along the brim to make it fluffy and festive.
Step 4: Add Cotton Ball Trim
Glue cotton balls around the edge of the paper plate to mimic the white, fluffy trim of a holiday wreath. Space them evenly for a clean, full look. This step not only frames the Grinch’s face but gives the wreath a soft, wintery feel.
Step 5: Decorate with Red Pom-Poms or Beads
To add a pop of color, glue small red pom-poms or beads in between the cotton balls. This creates a lovely ornament-like effect and makes the wreath even more eye-catching.
Step 6: Attach a Ribbon for Hanging
Flip the wreath over and tape or glue a loop of ribbon to the back for easy hanging. Choose a fun, festive ribbon with patterns like stripes, candy canes, or holly berries to complete the look.
Customization Ideas
Style 1: Glittery Grinch
Add green and red glitter to the face and hat for a sparkly effect. Lightly brush glue on the cotton balls and sprinkle with glitter to mimic fresh snow.
Style 2: 3D Pop-Up Hat
Instead of laying the Santa hat flat, fold and crease cardstock to create a 3D hat that pops up from the wreath. This adds a dramatic, dimensional touch.
Style 3: Grinch with Quote
Attach a banner or small tag at the bottom of the wreath with phrases like “Merry Grinchmas!” or “Stink, Stank, Stunk” to personalize your creation.
Educational or Seasonal Uses
This craft is excellent for holiday classroom projects, where students can practice cutting, gluing, and coloring. It ties in perfectly with reading sessions of “How the Grinch Stole Christmas,” making it both a literacy and art activity in one. It's also a festive addition to holiday parties, library programs, or scout troop meetings.
Printable Template
To make this project even more accessible, we’ve included a printable Grinch face template. Simply print it out, color it in, and glue it onto your green paper plate base. This step saves time and helps little ones who may not feel confident drawing the face on their own.
Having a printable template means this craft can be set up quickly for larger groups or younger kids. Just add glue, cotton balls, and a little creativity—and the Grinch is ready to hang!
Conclusion
Creating a Grinch Paper Plate Holiday Wreath is a delightful way to channel holiday excitement with a dash of fun. With simple supplies and a big dose of imagination, this DIY project offers festive flair that’s sure to bring some playful charm to your home or classroom. Whether you go classic or glittery, each wreath becomes a unique decoration that even the Grinch himself might crack a smile at!

DIY Grinch Paper Plate Holiday Wreath
Equipment
- Scissors
- Glue stick or craft glue
- Black marker
Materials
Materials
- 1 Green paper plate
- Red craft foam or felt for the Santa hat
- 12-15 Cotton balls
- 10 Red pom-poms or beads mini size
- 1 Yellow crayon
- 1 Pink crayon optional, for cheeks
- 1 Ribbon for hanging (optional)
Instructions
- Start by laying your green paper plate flat. This will serve as the Grinch’s face. If you only have white paper plates, you can color the surface green with paint or crayons before continuing.
- Using a black permanent marker, carefully draw the Grinch’s facial features—arched eyebrows, mischievous smile, nose, and eye outlines. Fill in the eyes with a yellow crayon. Add pink to the cheeks if desired.
- Cut a triangle shape out of red craft foam or felt to create a Santa hat. Glue it to the top edge of the plate. Add a cotton ball to the tip and along the brim.
- Glue cotton balls around the edge of the plate to frame the Grinch’s face and mimic a fluffy wreath trim.
- Glue red pom-poms or beads between the cotton balls for a festive, ornament-like look.
- Flip the wreath over and glue or tape a ribbon loop to the back for hanging.