
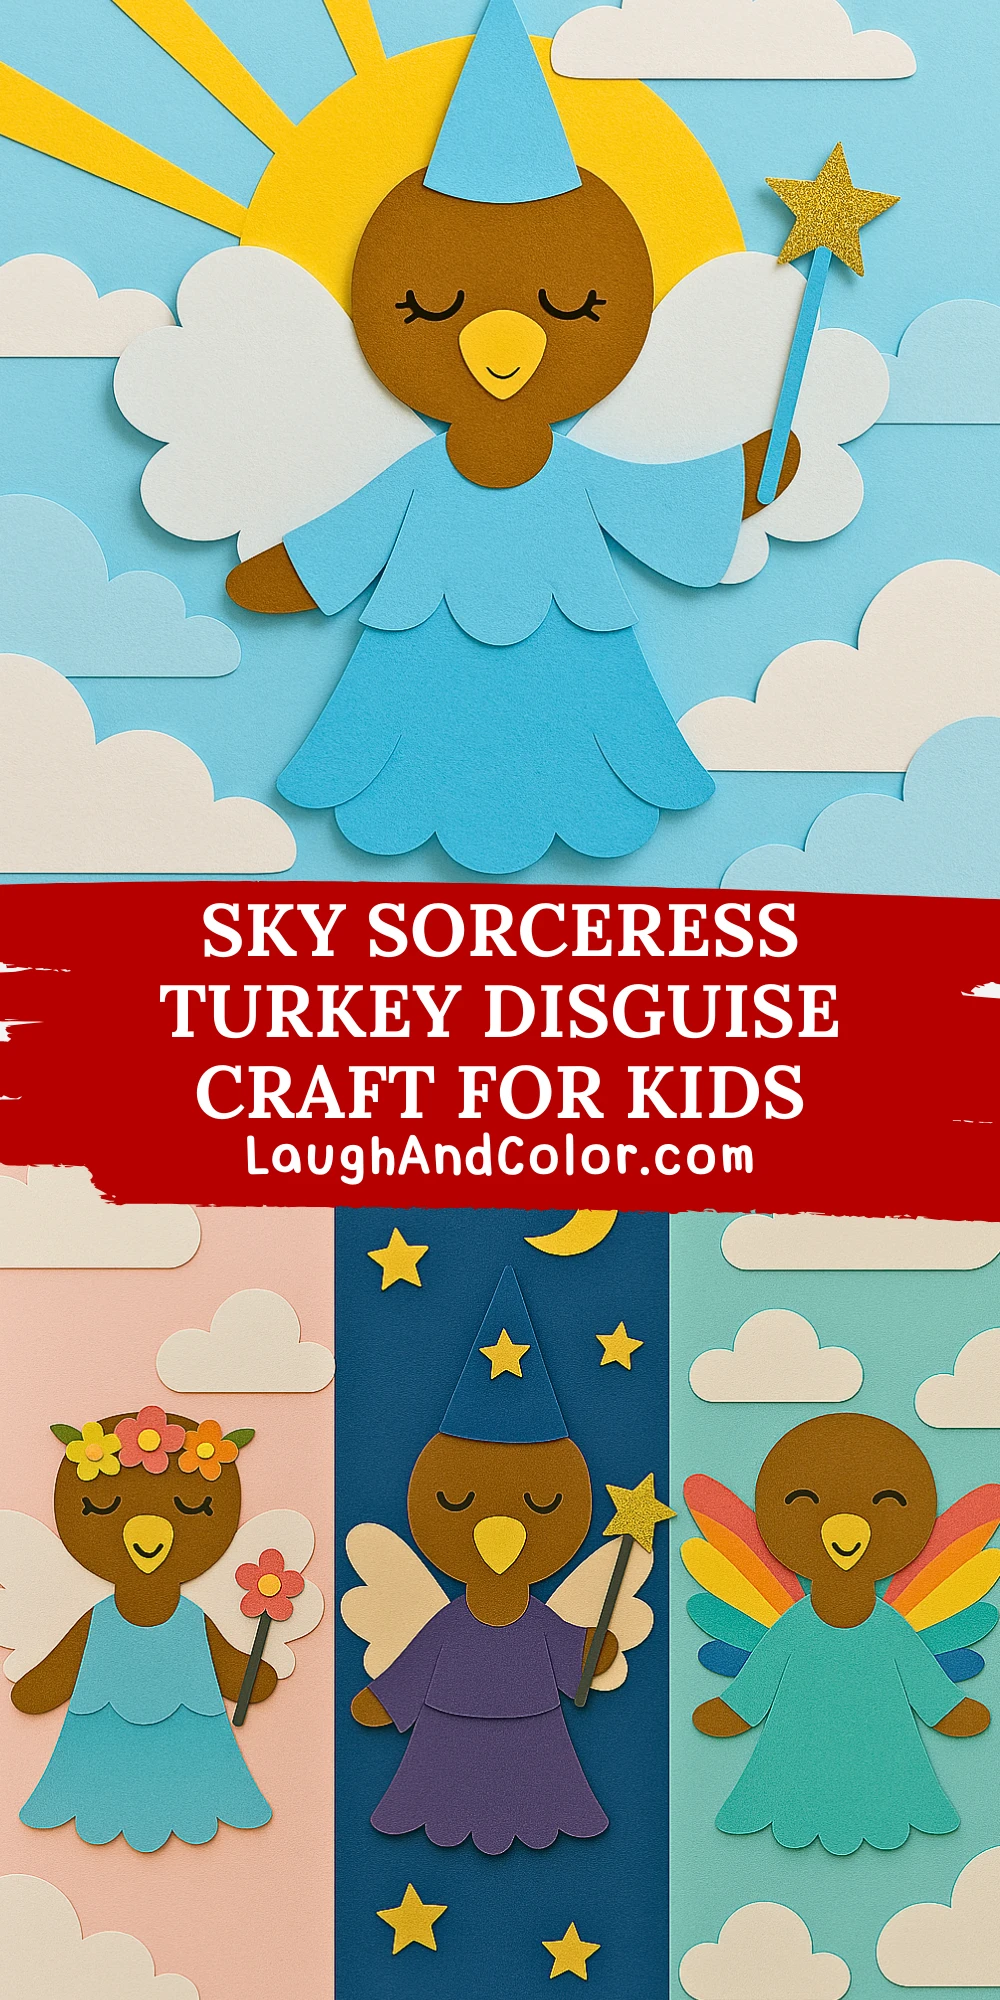
Turkey in disguise projects are a staple in many classrooms and homes during Thanksgiving season. The idea is simple but full of creative potential: disguise your turkey so it doesn't get eaten! This whimsical and enchanting Sky Sorceress version is a magical twist on the tradition, transforming your turkey into a mystical figure with floating clouds, a golden wand, and a charming sky-blue dress.
This craft project is ideal for preschoolers to early elementary kids and allows them to explore shapes, symmetry, and storytelling. With colorful paper and a little imagination, your disguised turkey will soar through the clouds instead of ending up on the dinner table. Whether you're doing this as a family bonding project or as a school assignment, this turkey disguise will bring giggles and gasps of delight.
Materials Needed
- Printable turkey outline (or pre-drawn turkey on cardstock)
- Colored construction paper (light blue, dark blue, yellow, white, brown, and black)
- Glitter foam sheet or gold glitter paper (for the wand)
- Glue stick or tacky glue
- Safety scissors
- Black marker or pen (for facial features)
- Optional: cotton balls for extra fluffy clouds

Step-by-Step Instructions
Step 1: Prepare the Turkey Base
Start by printing or drawing a basic turkey outline onto thick white cardstock. Cut out the shape and set it aside. This will be the foundation for the disguise, so make sure it's sturdy enough to support all the costume pieces.
Step 2: Create the Sorceress Dress and Sleeves
Using light and dark blue construction paper, cut out a scalloped-edge dress shape that flares at the bottom. Cut two small sleeve shapes to match the wings. Glue these dress pieces directly over the turkey’s body and wings. This will become the Sky Sorceress's flowing outfit.
Step 3: Make the Wings and Hat
Cut two large white cloud-like wing shapes and attach them behind the turkey’s body so they look like magical wings. Next, cut a simple cone shape out of light blue paper for the sorceress hat. Add a tiny band or decoration if desired, then glue it to the top of the turkey’s head.
Step 4: Design the Face and Beak
Use brown paper to create a rounded face and neck for the sorceress disguise. Cut a yellow triangle or heart shape for the beak. Draw eyes closed with a gentle smile using a fine black marker to give your turkey a peaceful, magical expression.
Step 5: Add the Wand and Star
Cut out a thin rectangle for the wand stick from blue paper, and top it with a gold glitter star. If you’re using a glitter foam sheet, it adds even more sparkle! Glue the wand into one of the turkey’s “hands” or wing tips to complete the enchanted look.
Step 6: Assemble the Scene
To give your craft extra character, create a background with clouds and a sun. Use yellow strips for sun rays and white paper or cotton balls for puffy clouds. Mount the turkey on light blue construction paper and arrange the scene around it.
Customization Ideas
1. Fantasy Fairy Turkey: Swap out the hat for a flower crown and use pastel tones like lavender and mint green. Add fairy wings instead of cloud wings and a floral wand.
2. Night Sky Wizard Turkey: Use dark blue and purple tones. Add silver stars and a crescent moon to the background. The wand can be topped with a silver moon shape.
3. Rainbow Cloud Guardian Turkey: Incorporate rainbow stripes into the dress and hat. The wings can be made from rainbow-colored tissue paper or layered cardstock.

Educational & Seasonal Uses
This craft is perfect for classroom Thanksgiving activities that blend fun with learning. Kids can write a story about their turkey’s magical powers, practice cutting and gluing for fine motor skills, and explore basic color theory while choosing paper combinations. It's also a gentle and creative way to talk about Thanksgiving traditions.
Printable Template
A printable template is available to make this craft easier and more accessible for kids of all ages. The template includes the turkey outline and pieces for the hat, dress, wand, and wings—ready to print on standard 8.5"x11" paper.
Simply print, color, cut, and assemble! This makes it a fantastic grab-and-go option for busy parents or teachers who want to offer a fun, no-prep activity.

Conclusion
The Sky Sorceress Turkey Disguise Craft offers a delightful escape into a magical world just in time for Thanksgiving. It’s a project full of whimsy, creativity, and fun storytelling potential. Once complete, your turkey will be safely soaring through the clouds, far away from any Thanksgiving table!

Sky Sorceress Turkey Disguise Craft for Kids
Equipment
- Glue stick or tacky glue
- Safety scissors
- Black marker or pen
Materials
- Printable turkey outline or pre-drawn turkey on cardstock
- Colored construction paper (light blue, dark blue, yellow, white, brown, black)
- Glitter foam sheet or gold glitter paper For the wand
- Cotton balls Optional, for fluffy clouds
Instructions
- Step 1: Prepare the Turkey Base – Print or draw a turkey shape on white cardstock and cut it out.
- Step 2: Create the Sorceress Dress and Sleeves – Cut a scalloped dress from blue paper and glue it onto the turkey’s body with sleeves.
- Step 3: Make the Wings and Hat – Cut two white cloud shapes for wings and a blue cone for the hat. Glue them onto the turkey.
- Step 4: Design the Face and Beak – Add a brown face, yellow beak, and draw peaceful eyes and smile with a marker.
- Step 5: Add the Wand and Star – Cut a wand and glittery star, then glue it in one of the turkey’s wings.
- Step 6: Assemble the Scene – Use yellow paper rays and white clouds to create a sky background and mount the finished turkey on it.