
Sugar skulls are a vibrant and symbolic part of the Mexican holiday Día de los Muertos (Day of the Dead), representing a joyful remembrance of loved ones. This Colorful Sugar Skull Candle Holder Craft is a creative way to bring that tradition into your home while exploring color, pattern, and festive design. Whether you're crafting with kids or just love adding unique seasonal decor to your space, this project is the perfect mix of meaningful and fun.

By transforming a plain skull-shaped candle holder into a bright, glowing centerpiece, you can express your creativity while learning about cultural traditions. This DIY is easy to adapt for all ages and skill levels, making it ideal for a classroom activity or cozy crafting session at home. With just a few materials and a little imagination, you'll have a dazzling sugar skull decoration to light up your table or altar.
Materials Needed
- 1 unpainted ceramic or plaster sugar skull candle holder (approx. 5-6 inches tall)
- Acrylic paints in a variety of bright colors (red, turquoise, yellow, pink, purple, etc.)
- Fine tip paint brushes and medium brushes
- Pencil (optional, for sketching designs)
- Battery-operated LED tealight candle (for safety)
- Clear acrylic sealer spray (optional, for protection)
- Water cup and paper towel for cleaning brushes

Step-by-Step Instructions
Step 1: Prep Your Skull Surface
Before you begin painting, wipe your skull candle holder with a dry cloth to remove any dust or residue. This helps the paint adhere better and gives a smooth surface to work on.
Step 2: Sketch Out Your Design
Using a pencil, lightly sketch floral patterns, swirls, hearts, and symmetrical elements on the skull. You can look at traditional sugar skulls for inspiration or create your own style. If you're working with younger crafters, you can skip this step and go straight to painting.
Step 3: Paint Base Colors First
Start by filling in large sections with your base colors. Common areas to begin with include the eyes (use a bright color like turquoise or yellow), the nose (usually black or dark purple), and the mouth area. Let the paint dry before layering additional colors.
Step 4: Add Decorative Details and Flowers
Use a fine-tip brush to add intricate floral designs, vines, and dots in contrasting colors. Think bright flowers around the eyes, swirls on the cheeks, and colorful petals on the forehead. Let each layer dry before adding another color to prevent smudging.
Step 5: Outline Eyes, Nose, and Teeth
With a black paint or fine permanent marker, go over the outlines of the eyes, nose, and mouth. You can create a petal-like border around the eyes or accent the teeth for a bold finish. This step adds definition and brings the design to life.
Step 6: Seal and Insert the Candle
Once your design is completely dry, spray the entire skull with a clear acrylic sealer to protect your work (optional). Place a battery-operated LED candle inside the skull and enjoy the warm, festive glow.
Customization Ideas
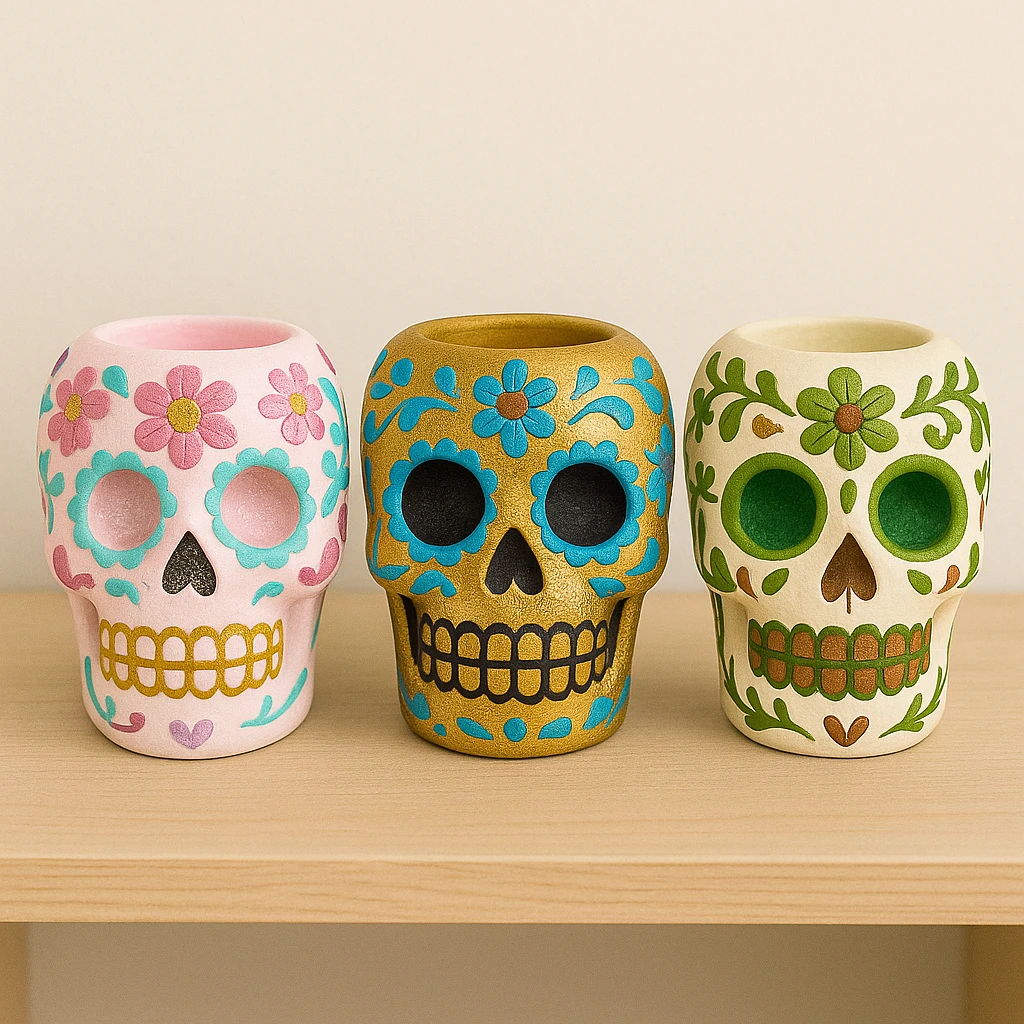
1. Pastel Glam Skull
Swap out traditional brights for pastel colors like blush pink, mint green, and lilac. Add glitter glue to give it a sparkly, glam look. This is perfect for softer, whimsical decor themes.
2. Metallic Fiesta Skull
Use gold, copper, and deep blue metallic paints to give your skull a bold, high-contrast style. Metallic accents around the eyes and mouth create a dazzling statement piece.
3. Nature-Inspired Skull
Stick to earthy colors like forest green, terracotta, and sunflower yellow. Use leaf motifs, mushrooms, or tiny critter illustrations to give it a rustic, outdoorsy charm.
Educational or Seasonal Uses
This craft is ideal for celebrating Día de los Muertos in schools, cultural centers, or at home. It opens up a conversation about the holiday's traditions, symbolism, and the importance of honoring loved ones. Teachers can incorporate this activity into a lesson on Latin American culture or art history. It also doubles as a colorful Halloween decoration that adds meaning beyond spookiness.
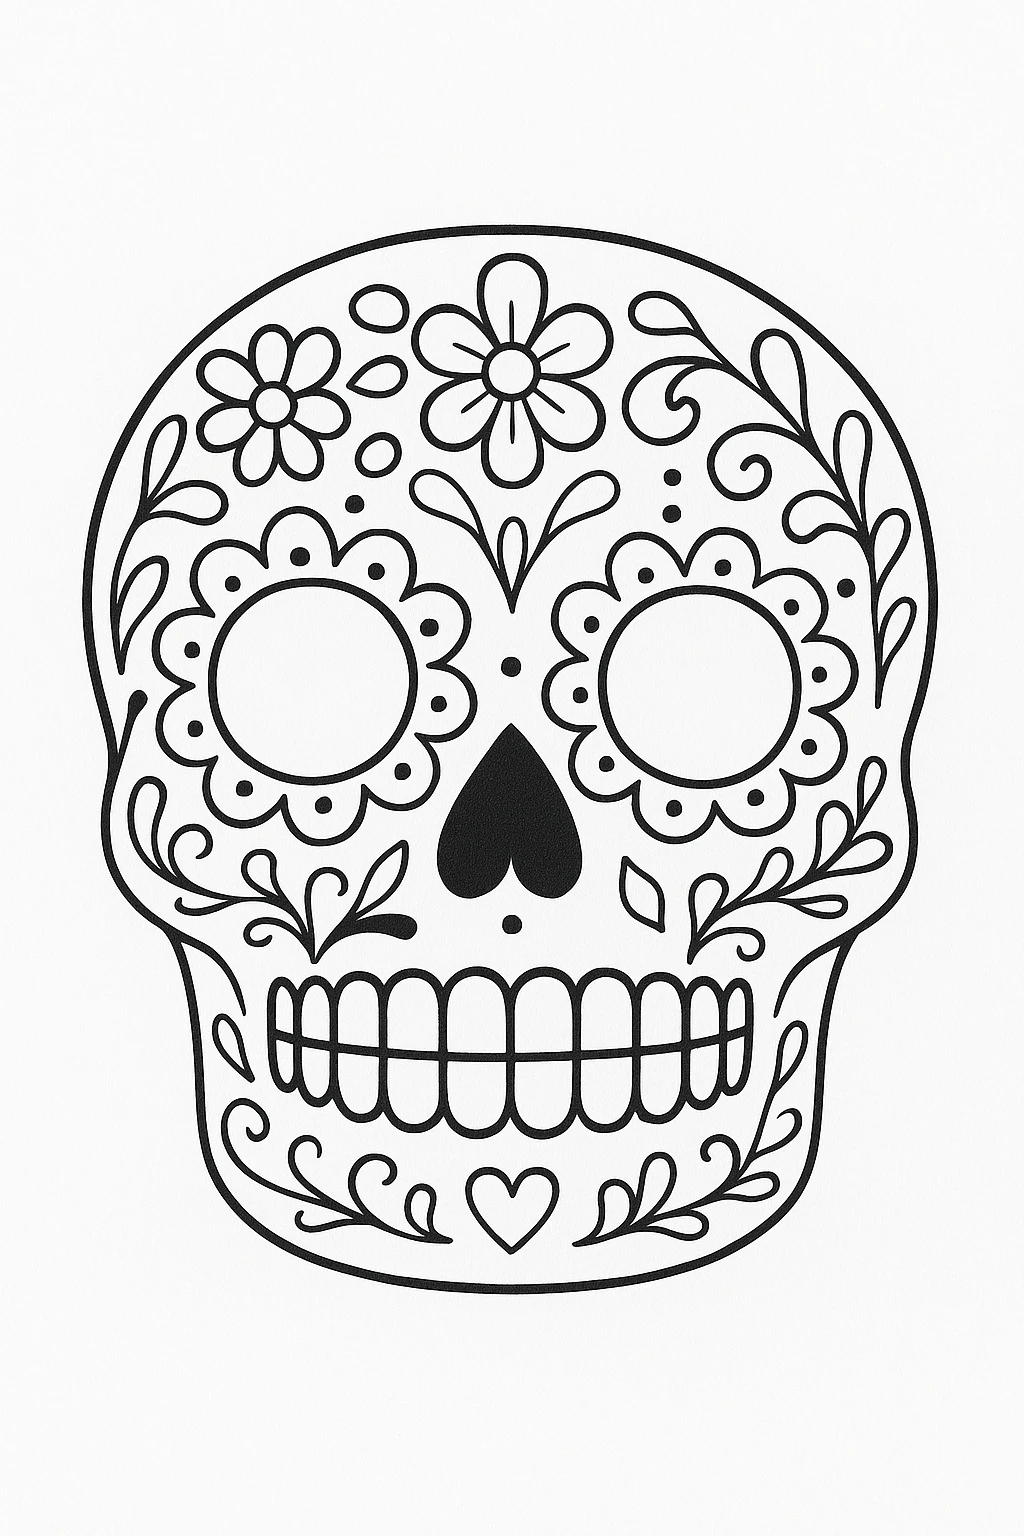
Printable Template
For those who want to simplify the process or work with younger children, a printable sugar skull coloring page is a great alternative. These templates allow kids to color pre-made designs or create their own with markers, crayons, or watercolors.
Just print, color, and you're ready to craft. You can even cut out the colored designs and glue them onto cardboard candle holders or display them as flat decorations for altars and walls.
Conclusion
Creating a colorful sugar skull candle holder is more than just a fun craft—it's a way to explore and honor a rich cultural tradition. Whether you're customizing your own skull design or working with printable templates, this project brings light, color, and meaning into any space. Celebrate creativity and heritage with a glowing tribute that lasts beyond the holiday season.

Colorful Sugar Skull Candle Holder Craft
Equipment
- Paint brushes (fine tip and medium)
- Water cup and paper towel
Materials
Materials
- 1 Unpainted ceramic or plaster sugar skull candle holder Approx. 5–6 inches tall
- Acrylic paints in various bright colors
- Pencil For sketching designs (optional)
- 1 LED tea light candle Battery-operated for safety
- Clear acrylic sealer spray Optional, for protecting paint
Instructions
- Wipe your skull candle holder with a dry cloth to remove dust or residue.
- Lightly sketch floral and decorative patterns using a pencil, or skip this step for freeform painting.
- Paint the base areas like eyes, nose, and mouth using bright acrylic paints. Let each color dry before layering.
- Add floral and vine details with a fine-tip brush in contrasting colors. Allow drying between layers.
- Outline the eyes, nose, and mouth with black paint or marker to define the design.
- Spray with a clear acrylic sealer once dry (optional). Place the LED candle inside and enjoy!